Lecture 6: Even More Images & Pycharm
June 29th, 2021
Today: parameters, start PyCharm, command line, bluescreen algorithm
These are all on HW2, due next Week.
What is a Function Parameter?
A parameter to as function provides some extra data to use when the function runs.
Suppose we have a function like this
def darker_left(filename, left):
        ...
The function has two parameters, filename and left, which are values for it to use. It loads the image in that file, and sets a stripe down its left side to be dark, with the width of the stripe specified by the left parameter.
When darker_left() function is called, the two parameters guide what it does. In this case the filename parameter gives the name of the file with the image to edit, e.g. poppy.jpg. The left parameter specifies the number of pixels at the left side of the image which should be darkened.
Here are three separate calls to the darker_left() function, showing the parameters at work:
For each call to the function, we say the parameters are "passed in" to the function. So above the first calls passes in 50 for the left parameter and the last call passes in 2.
How To Write a Function with Parameters
Look at the def again. The parameters are listed within the parenthesis.
def darker_left(filename, left):
        # write code in here
How to write this code: each parameter is like a variable. The value for the function to use has been set into the parameter (variable) already. The function code just uses the parameter, relying on the right value being in there. So in this case filename and left have the right values in them, the code here just uses it.
Write Code for darker_left()
def darker_left(filename, left):
    # your code here
    # use filename and left
    ...
Q: How many pixels on the left to darken?
A: Whatever value is in the left parameter.
Key idea: just use the parameters, filename and left - they are already set up with the values to use. In this case, if left is 50, we want to darken a stripe 50 pixels wide. If left is 2, we darker the a stripe 2 pixels wide. Work out he for/x/range loop to hit that stripe. Note this problem does not create a separate "out" image, so that keeps it simpler.
Solution code
def darker_left(filename, left):
    image = SimpleImage(filename)
    for y in range(image.height):
        for x in range(left):
            pixel = image.get_pixel(x, y)
            pixel.red *= 0.5
            pixel.green *= 0.5
            pixel.blue *= 0.5
    return image
Where Do the Parameters Come From?
Well if we're going to take it on faith that the parameters have the right values .. where do those values come from? In one word: the parenthesis.
Function in Two Worlds: def and call
Each function has two forms, equally important. The def specifies the code of the function, usually with many lines of code. There is one def for a function.
A call of a function is one line, calling the function by name to run it. The call specifies the values for the parameters within the parenthesis. There can be many calls to a function.
Look in the Run Menu
Look at the Run Menu for darker_left() carefully. For each case, you can see the syntax of the function call - the name of the function and a pair of parenthesis. Look inside the parenthesis, and you will see the parameters passed in for each run. Click the Run button with different menu selections to see it in action.
foo(a, b) Example
What do you see here?
def foo(a, b):
   ...
   ...
It's a function named "foo" (traditional made-up name in CS). It has two parameters, named "a" and "b".
Each parameter is for extra information the caller "passes in" to the function when calling it. What does that look like? Which value goes with "a" and which with "b"?
A call of the foo() looks like this:
   ....
   foo(13, 100)
   ...
Parameter values match up by position within the parenthesis. The first value goes to "a", the second to "b". It is not required that the value has the same name a the parameter.
Little Foo Interpreter Exercise
Claim: the parameter values from from the function call line, within the parenthesis.
Let's do a little live exercise along these lines.
The hack mode "interpreter", has a ">>>" prompt. You type a line of python code here, hit return. What you typed is sent to python to run, the results are printed after the ">>>".
We'll use this more later, but for now we can do a little function/parameter exercise.
Here we'll enter a little two-line def of foo(a, b) in the interpreter, then try calling it with various values. It's very unusual to define a function within the interpreter like this, but here's one time we'll do it. Normally we define functions inside a .py file.
The most important thing is that at the function call line, the parameter values are pulled from within the parenthesis.
The parameters match by position. So the first value goes to "a", the second value goes to "b". The number of parameters must be exactly 2 or there's an error, since foo() takes 2 parameters. The word "argument" is another word for a parameter, which appears in the Python error messages.
Each parameter value can be an expression - Python computes the value if needed, then sends that value as the parameter.
>>> # Define foo
>>> def foo(a, b):
      print('a:', a, 'b:', b)
>>>
>>> # Call it with 2 param values
>>> foo(1, 2)
a: 1 b: 2
>>> foo(13, 42)
a: 13 b: 42
>>>
>>> # Call with expressions - passes computed value, e.g. 60
>>> foo(10 * 6, 33 + 2)
a: 60 b: 35
>>>
>>> # Show that number of parameters must be 2
>>> foo(12)
Error:foo() missing 1 required positional argument: 'b'
>>> foo(12, 13, 14)
Error:foo() takes 2 positional arguments but 3 were given
>>>
>>>
>>> # Parameters do not match by name
>>> # Parameters match by position - first to "a", second to "b"
>>> b = 10
>>> foo(b, b + 1)
a: 10 b: 11
The Command Line
The command line is how your computer works "under the hood", and we'll use it in CS106A. Not pretty, but very powerful. We'll use it with a free program called PyCharm - see the PyCharm instructions on the course page.
For details see Python Guide: Command Line
The above guide has instructions to download this example folder: hello.zip
Unzip that folder. Open the folder in PyCharm (not the hello.py, the folder). In PyCharm, select "Terminal" at lower left - that's the command-line area. Then try running the hello.py program ("python3" on the Mac, ""py" on Windows).
$ python3 hello.py Alice
Hello Alice
$ python3 hello.py Bob
Hello Bob
$ python3 hello.py -n 100 Alice
Alice Alice Alice Alice Alice Alice Alice Alice Alice Alice Alice Alice Alice Alice Alice Alice Alice Alice Alice Alice Alice Alice Alice Alice Alice Alice Alice Alice Alice Alice Alice Alice Alice Alice Alice Alice Alice Alice Alice Alice Alice Alice Alice Alice Alice Alice Alice Alice Alice Alice Alice Alice Alice Alice Alice Alice Alice Alice Alice Alice Alice Alice Alice Alice Alice Alice Alice Alice Alice Alice Alice Alice Alice Alice Alice Alice Alice Alice Alice Alice Alice Alice Alice Alice Alice Alice Alice Alice Alice Alice Alice Alice Alice Alice Alice Alice Alice Alice Alice Alice
Image Grid Demo
Then we demo command lines from the image-grid homework. They look like this
$ python3 image-grid.py -channels poppy.jpg
$
$ python3 image-grid.py -grid poppy.jpg 2
$
$ python3 image-grid.py -random yosemite.jpg 3
Those are described in detail in the image-grid homework handout, so you'll see explanations for those when you begin the homework.
Color If Logic

Red Detect red >= 100
Red Detect - Average

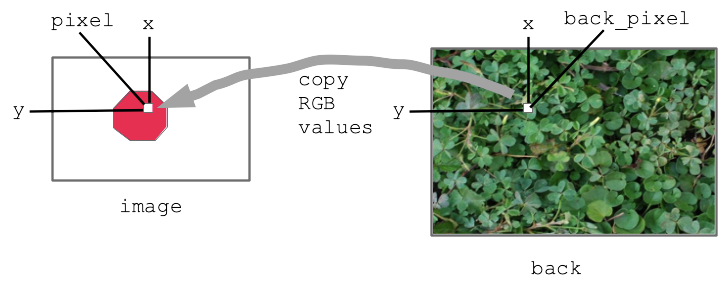
Bluescreen Algorithm
Bluescreen Algorithm Outline
Diagram:

Bluescreen Stop Sign Example
This code is complete, look at the code then run it to see.
Solution code
def stop_leaves(front_filename, back_filename):
    """Implement stop_leaves as above."""
    image = SimpleImage(front_filename)
    back = SimpleImage(back_filename)
    for y in range(image.height):
        for x in range(image.width):
            pixel = image.get_pixel(x, y)
            average = (pixel.red + pixel.green + pixel.blue) // 3
            if pixel.red >= average * 1.4:
                # the key line:
                back_pixel = back.get_pixel(x, y)
                pixel.red = back_pixel.red
                pixel.green = back_pixel.green
                pixel.blue = back_pixel.blue
    return image
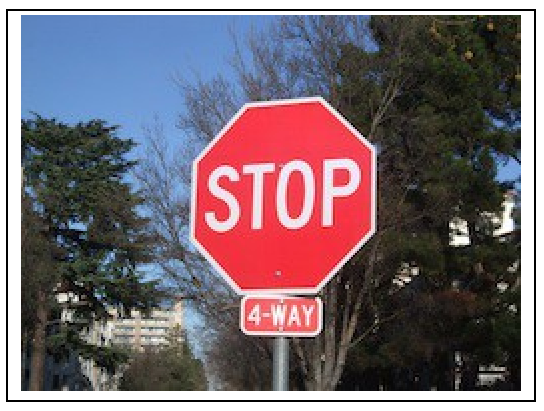
Before - the red stop sign before the bluescreen algorithm:

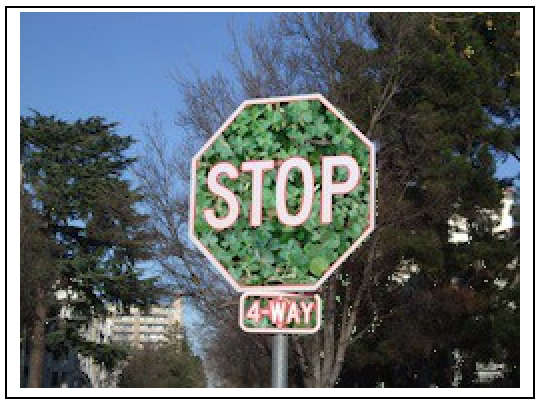
After:

Bluescreen Monkey
A favorite old example of Nick's.
Have monkey.jpg with blue background

The famous Apollo 8 moon image. At one time the most famous image in the world. Taken as the capsule came around the moon, facing again the earth. Use this as the background.

The bluescreen code is the same as before basically. Adjust the hurdle factor to look good. Observe: the bluescreen algorithm depends on the colors in the main image. BUT it does not depend on the colors of the back image - the back image can have any colors it in. Try the stanford.jpg etc. background-cases for the monkey.
The code is complete but has a 1.5 factor to start. Adjust it, so more blue gets replaced, figuring out the right hurdle value.