Assignment #2 Part (b): Image Grid
Due: 11:55pm (Pacific Time) on Tuesday, July 6th
Homework 2b - Image Grid
This part of the assignment will be completed in Pycharm. Please follow instructions on the Installing Pycharm handout to download python and Pycharm before starting.
How many times have you written the loops to copy some pixels from one image to another. I know right? A lot. For this project, you will write a function that solves pixel-copying once and for all, and then you can just call your function when you need that solved.
You'll write your code for this project in PyCharm and run your code from the command line. To get started, download image-grid.zip. Open that .zip file to get a "image-grid" folder. Copy that folder to your computer (in Windows, confusingly, the folder may be nested inside another folder with the same name). Open the image-grid folder with the PyCharm open... menu command to get started (do not double click the image-grid.py file to get started, as that introduces some problems).
Pillow Install
For this project you need to install the "Pillow" library. Use this line in the terminal, from within PyCharm:
If you have a windows computer:
$ py -m pip install Pillow
If you have a mac computer:
$ python3 -m pip install Pillow
It may mention something about your pip version, but you can ignore that. ("py" instead of "python3" on Windows.) The important thing is that Pillow is installed. More details in the Python install document on our home page.
main()
When a Python program runs, the special function main() is the first to run, and it calls other functions. For this program we provide a working main() function. Depending on the command line arguments, main() calls one or another of your functions as shown below.
a. Hello
Just to see that you have the command line working, run your program with the -hello flag with your name, like this:
$ python3 image-grid.py -hello Alice
Everything's coming up Alice!
$
On windows it's "python" or "py" instead of "python3". The easiest way to get a command line in your image-grid directory is probably the "terminal" tab at the lower-left of the PyCharm window of your image-grid project.
b. draw_image()
Write code for the draw_image() function. This function has five parameters, but what it does will seem familiar from your earlier nested/loop code. This function is the biggest part of this project — the rest of the project concerns calling this function to get various outputs.
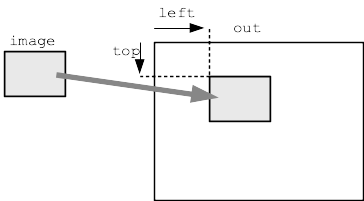
def draw_image(image, out, left, top, mode):
Draw image is given two images, image and out. The function draws a copy of image into out. The location of image is specified by the left and top parameters — left is the x value where the copy should begin, and top is the y value. So if the function is called with left=100 and top=50, then the (0, 0) pixel of image goes to the location (100, 50) in out, the (1, 0) pixel goes to (101, 50), and so on.
The mode parameter controls how the image is copied, it has four possible values: 'red', 'green', 'blue', 'all'
If mode is 'red' then only the red value of each pixel should be copied, leaving the green and blue values untouched. If mode is 'green' then only copy the green values, and for 'blue' copy only the blue values. If the mode is 'all' then copy all three values.
Use if-logic inside your loops, checking the mode to see if each color should be copied. There are many different ways the if-logic can be structured.
In previous exercises you would create the image objects, but here the image and out objects are passed in to this function fully formed; your code just uses them, e.g. accessing image.width and calling image.get_pixel().
Milestone 1: -test
When you work on a function, you want a way to run it so you can see if it works.
The provided function make_test() works with any original image. It creates a blue image 80 pixels wider and 40 pixels taller than the original. It then calls your draw_image() function, passing left 40 and top 20, to draw the original image centered on top of the blue.
Here is the result of calling it with poppy.jpg
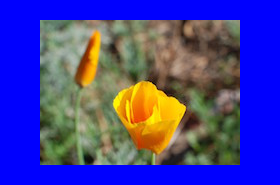
To try it yourself, run your image-grid.py with the command line as shown below. If draw_image() is correct, the result should show the image copied and centered on the blue as in the example above.
$ python3 image-grid.py -test poppy.jpg
c. make_channels()
Recall that the "red channel" of an image is a version of the image made of only its red lights, and there are analogous green and blue channels. Here are the red, green, and blue channels of the poppy.jpg image:
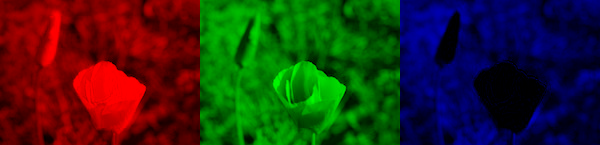
Complete the code for the make_channels() function. The provided code creates the out image. Call your draw_image() function three times inside make_channels() to draw the three channels. There are a lot of parameters here - the image and out parameters are easy enough. The left parameter is the most interesting, specifying the x value within the out image where each copy should land. For the top parameter pass 0, so the image is drawn at the top edge of the output.
To see an example of calling the draw_image() function, look at the make_test() function, which calls draw_image() passing 40 for the left, 20 for top, and 'all' for the mode.
To run your make_channels(), use the -channels flag on the command line like this.
$ python3 image-grid.py -channels poppy.jpg
Debugging - Exceptions and print()
Often when code runs the first time, we learn that it's not doing what we wanted. For the image loop code, you might see an "exception" - a run-time error - like the following that halts your program. The exception text should appear in the same terminal where you launched the program.
  File "./image-grid.py", line 116, in main
    make_channels(args[1])
  File "./image-grid.py", line 57, in make_channels
    draw_image(image, out, image.width * 2 + 1, 0, 'blue')
  File "./image-grid.py", line 27, in draw_image
    pixel_out = out.get_pixel(left + x, top + y)  # key line
  File "/Users/nick/cs106ap/code/image-grid-solution/simpleimage.py", line 178, in get_pixel
    raise e
Exception: get_pixel bad coordinate x 600 y 0 (vs. image width 600 height 145)
The exception text is very busy looking, but just read it from the bottom up. In this example, the exception message explains that there was a call to get_pixel() with x=600 in an image of width 600, so that halted the program with an error (the max x value is 599).
Looking above that, you can see that the "offending" line that called get_pixel() with the bad x was line 27 in the draw_image() function. So here are two possible strategies:
1. Go look at line 27. You know for an absolute fact that line 27 called get_pixel() with a too big x value. Maybe you can spot the logic error just looking at the code.
2. Add a print() statement just above line 27, printing out the interesting values that go into your algorithm like: image.width out.width, left, x. Run your code again, and the print output will appear in the terminal, showing you the real numbers the code is using.
Another good spot for a print() is as the first line of a function, printing out its parameter values, like image.width, out.width and left. A function may be called many times with different values, so this gives you an insight into what's going.
You should remove your debugging print() calls from your code before you turn in it, they are a sort of scaffolding just used during construction.
Milestone 2 -grid and -random
Once -test and -channels are working, your draw_image() is likely correct. We provide the code for additional -grid and -random features shown below. They call your draw_image() function in more ways to get neat output. Every pixel of output you see here is coming from your draw_image() function.
$ python3 image-grid.py -grid poppy.jpg 3

$ python3 image-grid.py -random yosemite.jpg 3
The "3" after the image filename above specifies how big the grid is, so you can experiment with different values. The -random feature selects the mode for each copy randomly between `'red' 'green' 'blue', so each run of the program yields a different random combination. Try running the program with various combinations. Always use the up-arrow in the terminal to pull up your previous command line, and then edit it vs. typing it in from scratch.
All Done
Someday, perhaps you can leverage your code here to make some avant guard art, or perhaps the sort of art that hotels buy in bulk. Some of the output of -random is eerily reminiscent of hotel art. But for now you are done with project, getting quite a lot of use out nested-loops to process 2-d data. Please clean up your code in image-grid.py and turn it at paperless as hw2.2.