Lecture 4: Introduction to Images
June 24th, 2021
Today: variables, digital images, RGB color, for loop
Reminders
PSA - What is "done" for a homework?
Real Life Sequence of a Computer Project
"Science is what we understand well enough to explain to a computer. Art is everything else we do." - Donald Knuth, CS legend and Stanford CS Professor emeritus
Variables - 2 Things To Know
More details later here: Python Variables section in the guide.
A Python variable has a name and stores a value. We'll start with two rules of variables.
1. Creating a Variable
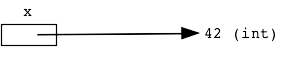
A variable is created in the code by a single equal sign = like this which creates a variable named x:
...
x = 42
...
The variable is set at the moment the line runs.
As a drawing, think of the variable as a little box, labeled with the variable's name, containing a pointer to the value stored.
2. Reading A Variable
After a variable is created, its name can appear in the code, e.g. x, and that use follows the arrow, retrieving whatever value was stored earlier. The name appears in the code as a bare word, no quote marks or anything.
Here's a little example. Suppose we set a variable named color to hold the value 'red'. Then subsequent lines can use color, and that retrieves the stored color.

color = 'red'
# instead of bit.paint('red')...
bit.paint(color)
bit.move()
bit.paint(color)
This paints 2 squares 'red', or whatever value was assigned to color on the first line.
Try It - All Blue
> all-blue
Go back to our all-blue Bit loop. Change the code to use a color variable as below. The variable color is set to hold the value 'blue', and the later lines just paint whatever color is in the color variable. This version paints the whole row blue.
def all_blue(filename):
    bit = Bit(filename)
    color = 'blue'
    bit.paint(color)
    while bit.front_clear():
        bit.move()
        bit.paint(color)
    bit.right()
Look at the lines bit.paint(color) lines - they refer to the variable by its name, following the arrow to retrieve 'blue' or whatever was stored there.
Q: How would you change this code to paint the whole row red?
A: Change line 3 to color = 'red' - the later lines just use whatever is in the color variable, so now they will paint red with no other change.
Interpreter / Hack Mode
Try the >>> Hack Interpreter - there's a button for this at the bottom of each problem page. You type a little expression at the ">>>" prompt and hit the enter key. Python evaluates it, prints the resulting value on the next line. We'll use this more as we get into more Python features.
>>> 1 + 1
2
>>> 1 + 2 * 3
7
In that second example, see that Python follows the order of operations in an expression - evaluate multiplication and division before addition and subtraction.
Interpreter - Variable Demo
Suppose we want to compute the number of hours in a week. Then try defining a days variable using =...
>>> 7 * 24
168
>>> days = 7
>>> days * 24
168
>>> # Can assign a new value to variable, overwrites old value
>>> days = 365
>>> days * 24
8760
Shows setting a variable with =. Any existing value in the variable is overwritten by the new value. Using that variable name later retrieves the most recent stored value.
Images - Numbers - Code
Digital Images - Pixels
RGB Color Scheme
Image Code - Pixels, Coordinates, RGB
Image Made of Pixels
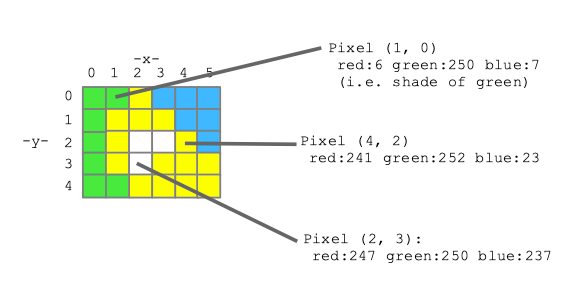
Image Loading Code
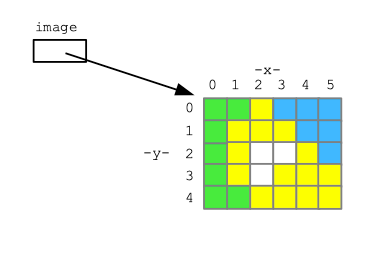
This line loads an image into Python memory, and sets a variable named image to point to it, ready for Python to work on it.
# Load an image from the filesystem
# into memory in variable named "image".
# Now the image can be manipulated by code.
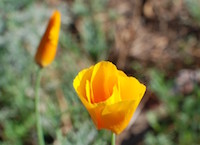
image = SimpleImage('flowers.jpg')
Have an Image, How To Change it?
Say we have loaded an image variable as shown above. Now we want to write code to change the image in some way.
For example, let's say we want to set the blue and green values in each pixel of the image to 0. This will leave just the red values. This is called the "red channel" of the image - an image made of just its red lights.
Preamble: pixel.red = 0
Suppose we had a variable pixel that referred to one pixel inside an image. (We'll show how to obtain such a pixel variable in the next step.)
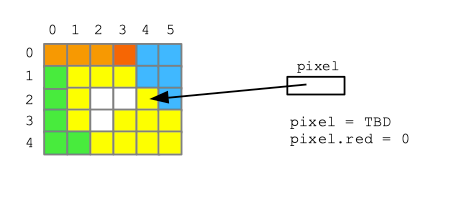
Then the syntax pixel.red or pixel.blue or pixel.green refers to the red or blue or green value 0..255 inside the pixel.
The code below sets the red value of the pixel to 0, using the = similarly to above.
pixel.red = 0
The Solution - for loop
Here is the code that solves it using a "for loop", and we'll look at how it works.
def red_channel(filename):
    image = SimpleImage(filename)
    for pixel in image:
        pixel.green = 0
        pixel.blue = 0
    return image
Here is a link - you can try running it first, then we'll see how it works
How It Works - Big Picture
For loop syntax:
for variable in collection:
    # use variable in here
Image Foreach Operation
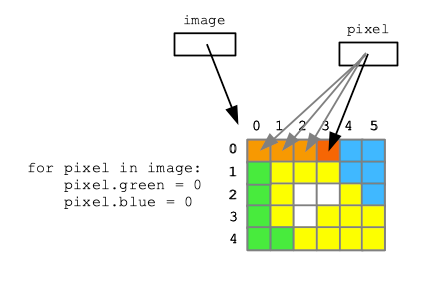
Image Foreach Observations
Side trip about math
Update Variable: x = x + 1
What does this do:
x = x + 1
x = 6
x = x + 1
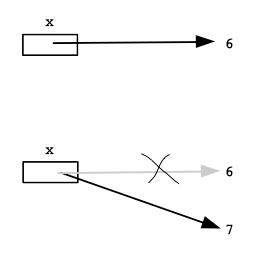
image1-b. Make Image Darker
    for pixel in image:
        pixel.red = pixel.red / 2
        pixel.green = pixel.green / 2
        pixel.blue = pixel.blue / 2
        # or shorthand form:
        # pixel.red /= 2
Relative Variable Shorthand: += -= *=
Shorthand way to write x = x + 1
x += 1
Shorthand for x = x * 2
x *= 2 # double x
>>> x = 10
>>> x += 3
>>> x
13
>>> x *= 2
>>> x
26
Image Coordinate System
Previously loaded image into memory like this. Now look at the x/y coordinate scheme of the pixels.
image = SimpleImage(filename)
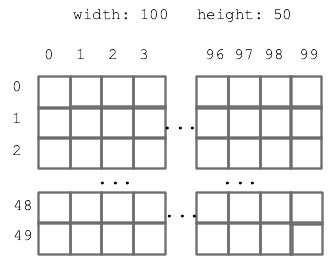
image.get_pixel(x, y)
# For the pixel at x=4 y=2 in "image",
# set its red value to 0
pixel = image.get_pixel(4, 2)
pixel.red = 0
Goal: Loop Over All the Coordinates
Step 1: range() function
for x in range(10):
Hack/Demo: Try In Interpreter
Demo (or you can try it). The print(xx) function in this context just prints out what is passed to it within the parenthesis.
>>> for x in range(10):
        print(x)
0
1
2
3
4
5
6
7
8
9
>>>
So here, we can see that foreach works with range, running the body once for each element.
Generating all x,y numbers for an image
Nested Loops
Nested in Interpreter
>>> for y in range(4):
        for x in range(5):
            print('x:', x, 'y:', y)
x: 0 y: 0
x: 1 y: 0
x: 2 y: 0
x: 3 y: 0
x: 4 y: 0
x: 0 y: 1
x: 1 y: 1
x: 2 y: 1
x: 3 y: 1
x: 4 y: 1
x: 0 y: 2
x: 1 y: 2
x: 2 y: 2
x: 3 y: 2
x: 4 y: 2
x: 0 y: 3
x: 1 y: 3
x: 2 y: 3
x: 3 y: 3
x: 4 y: 3
Example: Darker-Nested
Here is a version of the previous darker algorithm, but written using nested range()
def darker(filename):
    """
    Darker-image algorithm, modifying
    and returning the original image.
    This version uses nested range loops.
    Demo - this code is complete.
    """
    image = SimpleImage(filename)
    for y in range(image.height):
        for x in range(image.width):
            pixel = image.get_pixel(x, y)
            pixel.red *= 0.5
            pixel.green *= 0.5
            pixel.blue *= 0.5
    return image
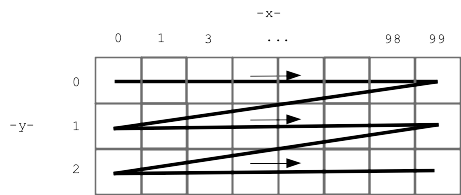
Here is a picture, showing the order the nested y/x loops go through all the pixels - all of the top y=0 row, then the next y=1 row, and so on.
Good news: this is our first nested loop. We'll do more later. It happens that the y/x nested loop for an image is idiomatic - it's the same every time, so you can just kind of use it while you get used to it.