Today: function-call, decomposition, call-the-helper, Python style
At the beginning, it's not working. You cycle through may configurations and false-start variations of not-working. Countless clicks of the Run button with bad results. Spend a lot of time in this phase. Finally you figure out the last piece at it works! Once it done, the solution can seem kind of clear, discounting the wandering path we took to get here.
Some truisms to keep in mind about this process.
1. Once the correct code is done and in front of you, it can seem kind of obvious. Like was I being dumb to go through all those miscues first? Appreciate that computer code is hard, with lots fiddly details to get just right. It's not just you that it can take a lot of iteration and fixes to get it working. That is the normal process.
2. It's not just you - most students are spending a ton of time in the process of getting it working.
3. Ideally, when it is done, you understand why every line is in there. You could re-solve it from scratch without too much work if you needed to. This is a higher bar than just "it has a green checkmark", and not always achieved, but it's what we are aiming for.
In CS, we generally prefer the simplest, most straightforward solution that works. Also known as the Keep It Simple Stupid (KISS) principle.
Funny quote from Brian Kernighan (early CS giant): Debugging is twice as hard as writing the code in the first place. Therefore, if you write the code as cleverly as possible, you are, by definition, not smart enough to debug it.
Mentioned in lecture-2 KISS coyote2 example - there using 2 while loops to solve a Bit problem with a horizontal line move, then a vertical line move. The while-loop is kind of the most direct translation of "move bit in a line and then stop". So to move bit in 2 lines, we write out 2 while loops.
CS106A doe not just teach coding. It has always taught how to write clean code with good style. Your section leader will talk with you about the correctness of code, but also pointers for good style.
All the code we show you will follow PEP8 which is the Python standard for superficial things like spacing and whatnot.
See our Python Guide Python Style section. We'll pick out a few things today (for hw1), re-visit it for the rest later.
Indent 4 spaces — e.g. within a def, or within a loop. The tab key does this for you automatically — when editing Python code, it will put in 4 spaces for you, and the delete key will take out 4 spaces.
def foo(filename)
    bit = Bit(filename)
    while b.get_color() != 'red':
        bit.move()
1 + 2 * 3


if x == 'red':
No space to the left of colon or comma. No space between a function name and its parenthesis. No space between parenthesis and their contents.
do_nums(1, 2, 3)
passThe word pass in Python means is a placeholder that does nothing. Often pass in the code marks the place where you add code. Remove the pass when you put your code in, it's just a placeholder.
def - 2 Blank LinesIn code with multiple functions, leave 2 blank lines between defs.
'red'PEP8 gives the option of enclosing text with single or double quotes like 'red' or "hello", asking only that one convention or the other be followed. For CS106A, we prefer to use single quotes, saving wear and tear on your shift key!
bit.move() Any Old Time?The answer is no. If there is a wall or black square in front of bit, then the move will fail with a runtime error.
...
bit.move()

bit.front_clear() before MoveEach move should be preceded by a check that bit.front_clear() returns True. In effect this is how bit looks one step ahead, checking that the way is clear. Checking that the front is clear is the issue with the next problem.
front_clear() returns True.
> double-move (while + two moves in loop)
The goal here is that bit paints the 2nd, 4th, etc. moved-to squares red, leaving the others blank. This can be solved with two moves and one paint inside the loop, but it's a little tricky.
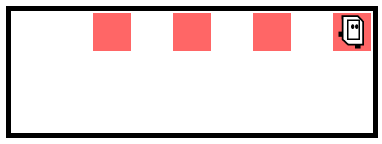
The code below is a good first try, but it generates a move error for certain world widths. Why? The first move in the loop is safe, but the second will make an error if the world is even width. Run with Case-1 and Case-2 to see this.
def double_move(filename):
    bit = Bit(filename)
    while bit.front_clear():
        bit.move()
        bit.move()   # possible error
        bit.paint('red')
Usually you run your code one case at a time, using the Run All option as a final check that all the cases work. In this case, Run All reveals that some cases work, and some cases expose a bug in this code.
To figure out what is wrong with your code and fix, run a single case so the lines hilight as it runs. Use Run-All to find a case with a problem, but don't debug with it.
The problem is the second move. It is not guarded by a front_clear() check, so depending on the world width, it will try move through a wall. The first move in the loop does not have this problem — think about the while-test just before it.
So the first move in the loop is safe, but we don't know if the second move is safe or not. The solution is to add an if-statement that checks if the front is clear for the second move, only doing the move if the front is clear.
def double_move(filename):
    bit = Bit(filename)
    while bit.front_clear():
        bit.move()  # This move is safe
        if bit.front_clear():
            bit.move()  # Needs preceeding check
            bit.paint('red')
A few keyboard tricks for editing code. On the Mac, "command" here refers to the "command" key. On windows it's either the control key or the windows key.
1. Select multiple lines - tab, shift-tab to indent and un-indent.
2. Select multiple lines - command-/ (command slash) comments and un-comments lines.
3. On the experimental server, command-enter .. hits the Run button.
4. Control-k "kills" a line of text, deleting it. Works in gmail and all web forms and in a lot of editors - super handy! It's more fun to hammer away at ctrl-k to get rid of lines of text when your draft is not working out.
The Falling Water problem in the puzzle section also demonstrates this issue for practice.
The strategy of "decomposition"
Big picture view of a program — a program made up of functions
Surprising fact — writing a series of smaller functions takes less time than writing an equivalent giant function that does the whole problem.
It feels a little magic when it works — call the helper, and, poof! The problem's gone.
To "call" a function means to go run its code, and there are two ways it is done in Python. Which way a function is called is set by its author when the function is defined.
For "object oriented" code, which is how bit is built, the function call is the noun.verb form, e.g. bit.left(). Here "left" is the name of the function. Your code calls bit functions with this form now, and in future weeks we'll use many functions with the same noun.verb syntax...
bit.left()        # turn bit

lst.append(123)   # append to list
def - Function Name and CodeLook at a def again to see what it does. Here's what def for a bit problem might look like...
def go_west(bit):
    bit.left()
    bit.paint('blue')
    ...
The def establishes that this function name, go_west, refers to these indented lines of code. the def does not run the code. It establishes that this name refers to this code. If another part of the program wants to refer to this function, it uses the name go_west.
The second type of function call in Python is deceptively simple. You just type the function's name with parenthesis after it. Here is what a line of code calling the above go_west function looks like:
    ...
    go_west(bit)
    ...
The word "bit" goes in the parenthesis for now. That's a parameter that we will explain in detail later.
Calling a function prompts the computer to go run the code in that function, and then comes back to where it was. Say for example the computer is running in a "caller" function, and within there is a call to a foo() function - the computer goes to run the foo() code, then returns and continues in the caller function where it left off.
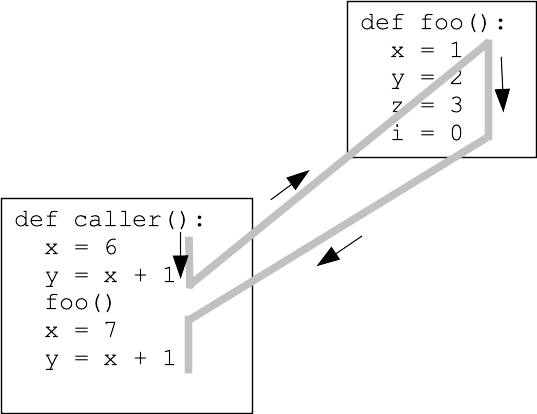
The computer is only running one function at a time.
This example demonstrates bit code combined with divide-and-conquer decomposition. We'll write a helper function to solve a sub-part of the problem.
The whole program does this: bit starts at the upper left facing down. We want to fill the whole world with blue, like this
What we have (before):

What we want (after):
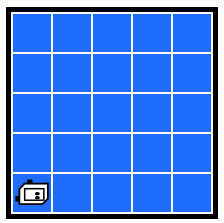
fill_row_blue()First we'll decompose out a fill_row_blue() function that just does 1 row.
This is a "helper" function - solves a smaller sub-problem.
fill_row_blue() Before (pre)

fill_row_blue After (post):
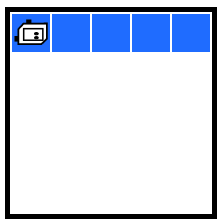
We could have you write the code for this one, but we're providing it today to get to the next part.
Run the fill_row_blue() helper a few times (Case-1) to see what it does.
# Suppose want to call a() then b()
a()
b()
Does this work? What's the postcondition of a()? Does it match the precondition of b()?
e.g. Maybe a() leaves Bit facing down, but b() requires Bit facing up, so I need to add in a little adjustment between the two function calls to mesh them together.
Now comes the magic step for today - calling the helper function.
fill_world_blue()To build a big program, don't write the whole thing and then try running it. Have a partially functional "milestone", get that working and debugged. Then work on a next milestone, and eventually the whole thing is done. This is a time-saving practice. Our assignment handouts will build up each project in terms of milestones, to help build up this habit.
This can be done with 1 line of code. Think function-call.
A: Call the helper function - key example for this lecture
Code this up, click Run to see what it does, though it does not solve the whole problem.
Where is bit after the call? Look at the post condition.
Move bit down to row 2. Call helper again.
Put in a while loop to move bit down the left edge until hitting the bottom. Call the helper for each moved-to row. This solves all the rows except the top row.
...
while bit.front_clear():
    bit.move()
    fill_row_blue(bit)
Put in one call to the helper to solve the top row, then the loop solves all the lower rows.
fill_world_blue() Solution
def fill_world_blue(filename):
    bit = Bit(filename)  # provided
    fill_row_blue(bit)
    while bit.front_clear():
        bit.move()
        fill_row_blue(bit)
> Fancy
Bit is moving past some lone blocks. We want each block to get a fancy paint job like this, where the afterwards the block has red to its left, green on top, and blue to its right.
Fancy - what we have and what we want


paint_one(bit)Helper function, paint around one block.
Pre: facing block

Post: painting done, back on the starting square, but facing away from block

paint_one(bit) CodeThis code would be easy enough to write, but we're providing it in the starter code to focus on the decomposition step.
Notice also the tripe-quote """Pydoc""" at start of the function. This is a Python convention to document the pre/post of a function.
def paint_one(bit):
    """
    Begin facing square. Fancy paint
    around the square. End on start square,
    facing away from square.
    """
    bit.left()
    bit.move()
    bit.right()
    bit.move()
    bit.paint('red')
    bit.move()
    bit.right()
    bit.move()
    bit.paint('green')
    bit.move()
    bit.right()
    bit.move()
    bit.paint('blue')
    bit.move()
    bit.right()
    bit.move()
    bit.left()
Recall what we want


First step, write the standard while-loop to move bit forward to the side of the world.
    while bit.front_clear():
        bit.move()
Write an if-test in the loop to detect the block. What test is True if a block is above bit? Make a little drawing to work it out.
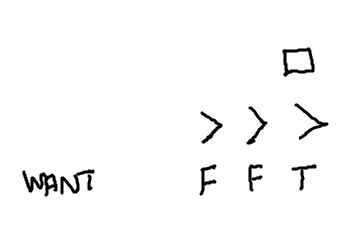
A: A good start is bit.left_clear() - however, it has exactly the opposite T/F of what we want, so the correct if-test is not bit.left_clear(). Write the if-test, then worry about the code inside the if-statement to paint the block.
Q: How to fancy paint the block? i.e. the code that goes inside the if.
A: Call the helper function - today's theme. Is bit facing the correct direction for the call? No, need to turn left to face the block before calling, matching the pre of the function. (Work a little drawing for these details).
Q: What way is bit facing after calling the helper?
A: Down - the post of the paint_one() tells us this. We cannot resume the while-loop with bit facing down (you could run it and see). The while loop had bit facing the right side of the world - turn bit to face that way. With bit's direction matching what the while-loop had before, the while loop will resume properly. (Work a little drawing for these details.)
    ...
    while bit.front_clear():
        bit.move()
        if not bit.left_clear():
            bit.left()
            paint_one(bit)
            bit.left()
Put in the call to the helper - minding the pre and post adjustments before and after the call. Run it to see how it works.
Look at Case-3 - another row of blocks below. Actually we want bit to fancy paint blocks both above and below its horizontal track. This will not be much work, since we have the helper function.
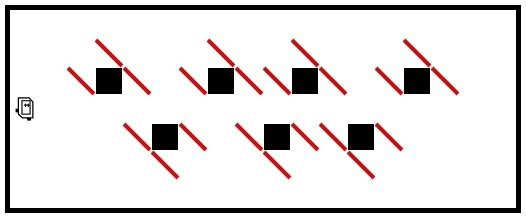
Q: What is the if-test that is True for a block below as bit goes to the right.
A: Similar to previous test, just swapping left/right: if not bit.right_clear():. Add the if-statement for the lower block below the code for the top block.
Q: How to paint the lower block?
A: Call the helper again. Need to account for pre/post as before. It's fine to use copy/paste to re-use the code for the top block, but remember to then update the details in the pasted version — it's a common mistake to forget to update a word after a paste. The helper will work, requiring only that we face the block before calling it (the helper is elegantly direction-independent in this way).
Here's the working code. The paint_one(bit) lines are the key lines for understanding decomposition.
def paint_all(filename):
    """
    Move bit forward until blocked.
    For every moved-to square,
    Fancy paint blocks which appear
    to the left or right.
    """
    bit = Bit(filename)
    while bit.front_clear():
        bit.move()
        # Detect block above
        if not bit.left_clear():
            bit.left()
            paint_one(bit)  # Call the helper
            bit.left()
        # Block below
        if not bit.right_clear():
            bit.right()
            paint_one(bit)
            bit.right()
Important CS strategies to observe in the Fancy Paint example:
Decompose out a helper for a subproblem. It's big help later on the main problem.
Need to think about the pre/post before and after the call to the helper to mesh things together.
This problem is complex enough where the make-a-drawing technique is helpful to tame the details, meshing the parts together.
Q: look at the main output - how many bit.paint('red') lines are in this program?
A: Just one. Decomposition is about making a helper and then using it heavily, in effect making one copy of the code and then re-using it everywhere it applies. This is how there's only a single bit.paint('red') and yet there's so much red in the output.
Some other points to clean up, if we have time.
There is a convention to put the helper functions first in the program text. The larger functions that call them down below. This is just a habit; Python code will work with the functions in any order. Placing the helpers first does have a kind of logic — the paint_one() helper is first, and it is the simplest and does not depend on another function. Then the function that uses it is below.
At the top of each function is a description of what the function does within triple-quote marks. This is a Python convention known as "Pydoc" for each function. The description is essentially a summary of the pre/post in words, see the """ section in here:
def paint_one(bit):
    """
    Begin facing square. Fancy paint
    around the square. End on start square,
    facing away from square.
    """
    ...
For now, the provided code includes the written Pydoc, but later we'll have an exercise where the problem statement directs the student to write the Pydoc.
Extra practice - we are not doing this one in class.
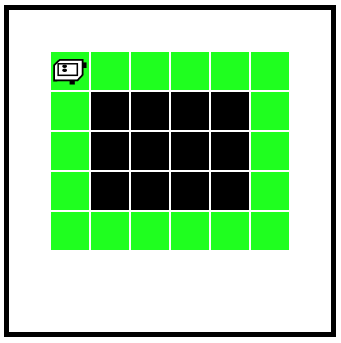
Bit starts next to a block of solid squares (these are not "clear" for moving). Bit goes around the 4 sides clockwise, painting everything green.
cover_square() Before (pre):
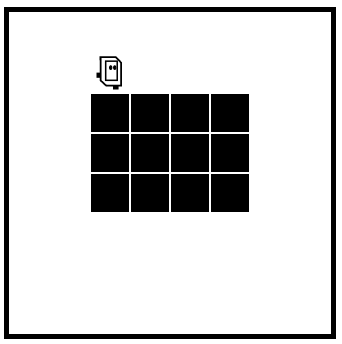
cover_square() After (post):
cover_side()Code for this is provided.
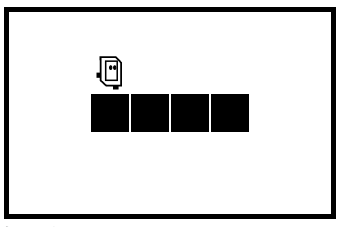
cover_side() Before: on top of first square, facing direction to go
cover_side() After - move until clear to the right, painting every square green
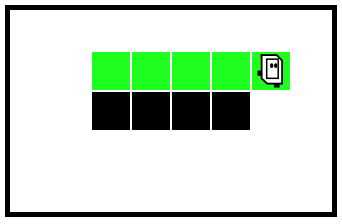
cover_side(bit) specification: Move bit forward until the right side is clear. Color every square green.
Run this code with case-1, to see what it does. (code provided)
cover_square()cover_square(bit) specification: Bit begins atop the upper left corner, facing right. Paint all 4 sides green. End one square to the left of the original position, facing up.
Add code to paint the top and right sides. Key ideas: