Image source: Rob's Puzzle Page
Edge-matching Puzzles
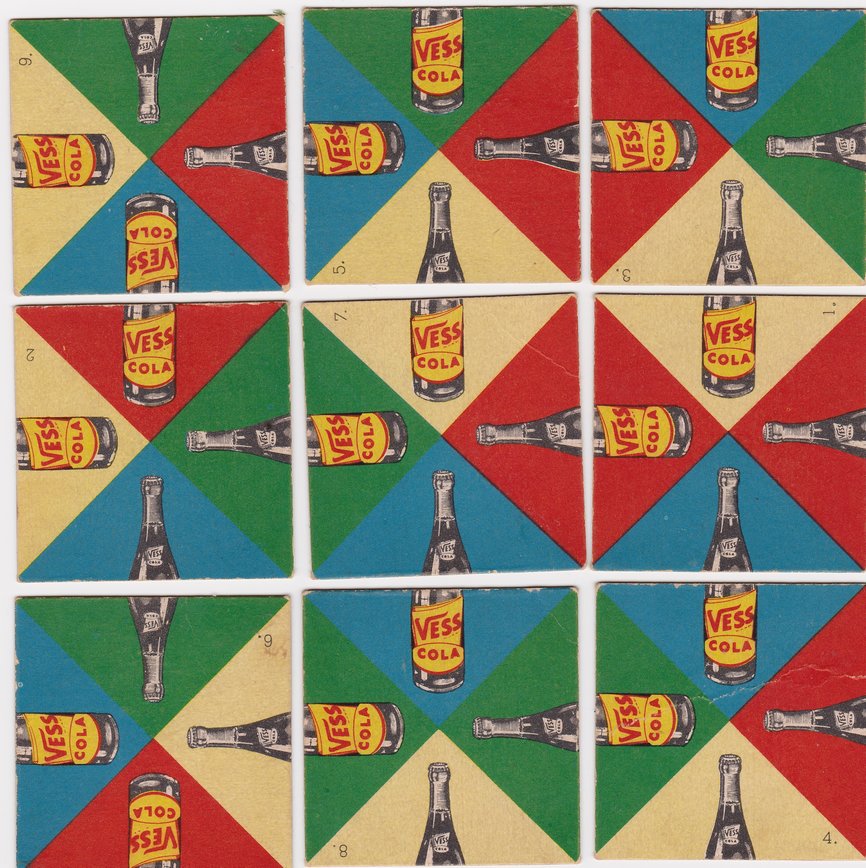
In this part of the assignment, you will explore using backtracking recursion to solve an edge-matching puzzle. Edge-matching puzzles have been around since the late 1800s; the vintage puzzle for Vess Cola shown above was a common advertising giveaway during the 1930s-1950s. For the puzzle, you are given a set of square tiles that have patterned edges and the goal is to place all tiles into a grid, having located and rotated all tiles in such a way that all edges "match". In the Vess puzzle, the edge containing a bottle top in a particular color triangle "matches" the edge containing a bottle bottom in the same color triangle. As an example, consider the middle tile of the puzzle, which correctly matches on all edges. Its north edge (cream bottle bottom) matches the south edge (cream bottle top) of the adjacent tile above. Its east edge (red bottle top) matches the west edge (red bottle bottom) of the adjacent tile to the right, and so on for its south and west edges. On the other hand, the corner tile in the upper left does not match on its east edge nor on its south edge.
Edge-matching puzzles are very difficult to solve by hand. Each tile can be placed in any of the nine grid locations and rotated in one of four possible orientations. This gives a total of 9! * 4^9 combinations, over 95 billion options! But, with your crack recursive backtracking skills, and thanks to the fast computation abilities of modern computers, your program will be able to completely solve these puzzles in mere milliseconds.
To complete the assignment, you will be using C++ classes and implementing a recursive backtracking algorithm to find a solution to the puzzle.
You will edit and submit the following files:
Tile.cpp, the code for the Tile class, an object that represents the tile and its edges.Puzzle.cpp, the code for the Puzzle class, an object that represents the state and logic for a puzzle grid.puzzle-solve.cpp, the code that runs the game and solves the puzzles.
Interactive Game Play
For a 3x3 puzzle, the goal to place all 9 tiles on the grid having located and rotated each tile so that all edges match. When playing the game interactively, the player selects one of the available tiles and rotates it to a desired orientation. If the tile forms a match to the adjacent tiles, it can be added to the grid. The tile is added at the next unfilled location. The grid is filled left-to-right and then top-to-bottom, so the first row is filled first, then the second row, and finally the third row. The game-play only allows adding a tile when its edges match the adjacent tiles already on the grid. If the player finds themselves at a dead end, they can remove previously added tiles and try a different arrangement.
As the player adds and removes tiles, the puzzle comes into shape, but it will take a lot of tries to arrive at a full solution. Few humans have the infinite patience required, this is where your newly-acquired mojo with recursion saves the day! When the player clicks "Run my solver", your computer solver takes over to attempt to finish solving the puzzle. Backtracking FTW!

Puzzle Notation
In order to solve a puzzle in code, we need a computer-friendly way to represent a puzzle and its tiles (that said, an awesome follow-on project would be to instead use computer vision to detect matching edges!). In our version, we label each tile edge with a string which matches with its complement.
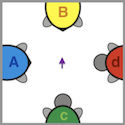
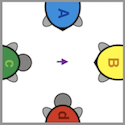
Here is a tile from the turtle puzzle in its original orientation:
A puzzle configuration assigns a label to each edge and defines the complement for each label. For the turtle puzzle, the edge labels used are A for blue, B for yellow, C for green, and D for red. The turtle head edge is lowercase and is the complement to the turtle tail edge which is uppercase. A yellow head edge (b) matches the yellow tail edge (B) and so on for the other colors. The string description of a tile is the edge labels in order north-east-south-west, the tile above is the string "B-d-c-A".
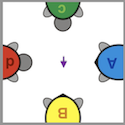
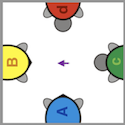
In the images below, we annotated each edge with its label and put a purple arrow in the middle that points to the north edge of the original orientation. We demonstrate rotating the tile through a sequence of clockwise quarter-turns. As the tile rotates, its string description is changing from "B-d-c-A" to become "A-B-d-c", then "c-A-B-d" and finally "d-c-A-B".
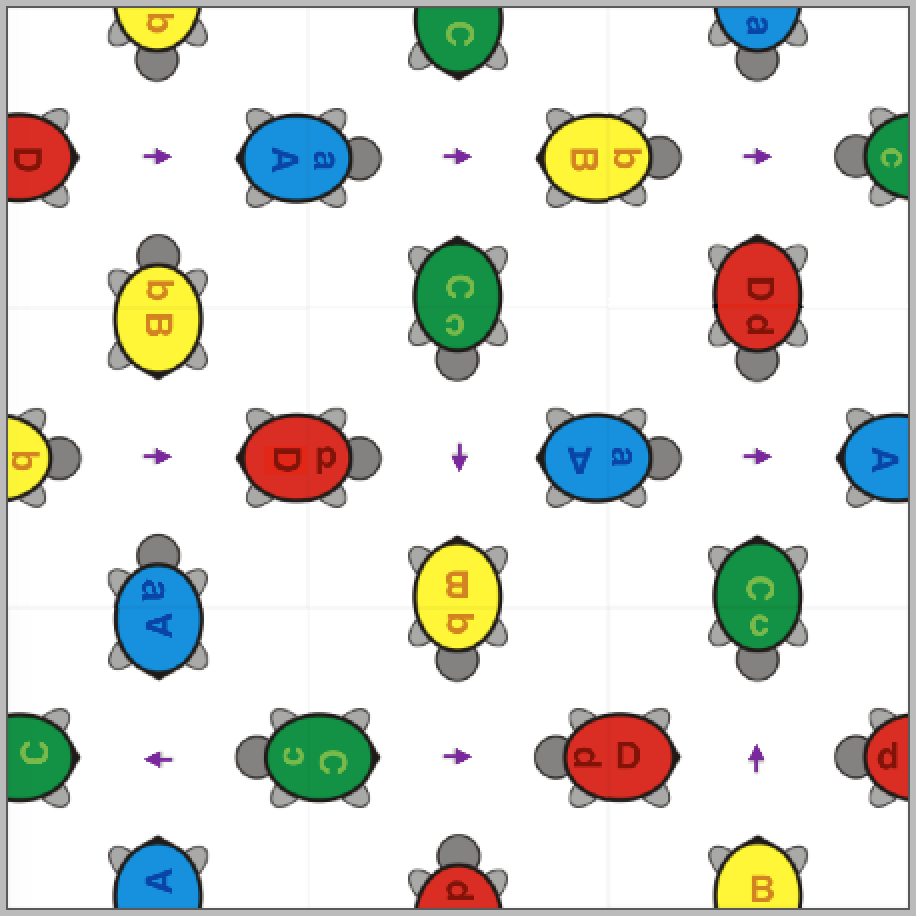
Below is a completed solution of the turtle puzzle using the annotated tiles. Note that each pair of adjacent edges has an upper-lower "match" (A/a, B/b, C/c, or D/d). Looking at the purple arrows, you can see that the only tile in its original orientation happens to be the tile in the lower-right corner. All others are rotated. The single tile examined above ended up in the middle location of the solution, rotated two quarter-turns from its original orientation.
Implementation Details
You will write code in the following three files. We will describe them in detail in this section.
Tile.cpp, the code for the Tile class, an object that represents a single tile.Puzzle.cpp, the code for the Puzzle class, an object that represents the state and logic for a puzzle grid.puzzle-solve.cpp, the code that runs the game and solves the puzzles.
We provide one other module of support code (PuzzleGUI.cpp) that handles the graphics and user interaction to play the game. You should not need to review or edit this file.
Tile.h and Tile.cpp
Tile.h and Tile.cpp are the interface and implementation files for the Tile class. Tile.h includes comments so that you know the intented behavior of each member function. Here are the functions you will write in the Tile class:
Tile member |
Description |
|---|---|
Tile(string n, string e, string s, string w) |
Constructor for a new Tile. Initializes the member variables _north, _east, _south, and _west edge strings according to the arguments. The first line of the constructor provided in the starter code also sets the _id variable (necessary to use the class in a Set or Map). Do not change this line! |
string getEdge(Direction dir) const |
Returns the label string for the tile edge corresponding to Direction (see below for details of this type). This member function is marked const which indicates that none of the member variables are modified by this function. |
void rotate() |
Rotates the tile one quarter-turn in the clockwise direction. After a rotate operation, the edge that was previously facing west has moved to north, what was south has moved to west, and so on. |
The Direction type
The Stanford C++ library defines an enumerated type Direction (documented in direction.h), which encodes the four compass points, NORTH, EAST, SOUTH and WEST. The argument to the Tile getEdge function is a value of type Direction.
Here is some sample use of the Direction type:
for (Direction dir = NORTH; dir <= WEST; dir++) {
    Direction facing = opposite(dir);
    cout << "direction " << dir << " faces the opposite direction " << facing << endl;
 }

if (dir == NORTH)  ...

switch(dir) {
    case NORTH: ...
    case EAST: ...
}
The Tile member functions listed below are provided to you pre-written, but you may want to familiarize yourself with them to aid in debugging:
Tile member |
Description |
|---|---|
Tile() |
The default constructor, creating a "blank" tile. Blank tiles are used when checking for a neighbor match (i.e., if a tile is blank, any other tile will match when checked against it). |
bool isBlank() const |
Returns true if a tile is blank, false otherwise |
string toString() const |
Returns a string of the tile edges in format north-east-south-west |
string displayTileStr() const |
Returns a human-readable formatted string representing a tile and its edges |
Puzzle.cpp
You only have to write one function in the Puzzle.cpp file.
Puzzle member |
Description |
|---|---|
bool canMatchEdge(Tile tile, GridLocation loc, Direction dir) const |
The function is used to answer the question "if I added tile at loc in the grid, would its edge in direction dir match the opposite edge of the adjacent neighbor?" If there is no neighbor in that direction (i.e. neighbor location is out of bounds or contains a blank tile), it is considered a match. Said another way, an edge that faces a exterior border or blank tile is a valid match. |
The Puzzle class has the additional member functions and data listed below. These are provided to you pre-written. You are encouraged to review the code to understand how it works, but you should not edit these functions. You will call on some of these functions when writing your recursive solver. In the table, we note which ones we think are especially critical for you to understand (and potentially use):
Puzzle member |
Description | Critical to understand? |
|---|---|---|
void configure(int numRows, int numCols, Map<string, string>& pairs) |
Configure puzzle settings | |
bool isFull() const |
Returns true if grid is full |
Yes |
bool isEmpty() const |
Returns true if grid is empty |
|
bool canAdd(Tile tile) const |
Returns true if tile can be added to the grid at the next unfilled location |
Yes |
void add(Tile tile) |
Adds tile to the grid at the next unfilled location. add does not verify validity of match (use canAdd for that) |
Yes |
Tile remove() |
Removes the last tile added to the grid | Yes |
bool isComplement(string one, string two) const |
returns true if the two strings are complementary edge labels. I.e., A and a from the turtle example given previously |
Yes |
Grid<Tile> _grid |
A grid of tiles. Any location that is unfilled contains a blank tile. | Yes |
Map<string, string> _complementMap |
A map of matching edge label pairs, e.g., A -> a, and B -> b. The map contains the matches in both directions. If map contains pair A -> a, map also has the inverse pair a -> A. |
Yes |
int _numFilled |
The count of tiles that have been added to the grid. |
solve()
Once you have completed and thoroughly tested your Tile and Puzzle classes, now you'll ready to put them to work. The culminating function you are to write is the recursive solve() function in puzzle-solve.cpp. The function has the following signature:
bool solve(Puzzle& puzzle, Vector<Tile>& tileVec);
The two arguments to solve are the puzzle and a vector of additional tiles. The solve function attempt to fill the grid by adding the tiles from the vector in such a way that all edges match.
The puzzle is the current puzzle grid, potentially already partially filled with some tiles. The Puzzle class is implemented to only allow adding tiles to the grid that match the rest of the grid, so you are guaranteed that the tiles already on the grid are correctly matched. Your solver will begin solving from this point forward. Note that depending on which tiles have already been added before solve is called, it may not be possible to to find a solution from this starting point. Each our provided puzzles has a valid solution when starting from an empty grid.
The tileVec is a vector of tiles that still need to be placed to complete the puzzle.
Recall from above that the Puzzle class has many functions that you can use, and you will need them here. The visualization game-play mimics the big recursive ideas: in other words, once you have the Tile and Puzzle classes complete, you can play the game manually and see the big picture. We don't want to give too much of it away here, but there is a beautiful backtracking pattern at work here that you will code up.
Development Strategy
-
Complete and test the
Tileclass before writing any other code. To test, use thePROVIDED_TESTs inTile.cpp. -
Next implement the
canMatchEdgefunction inPuzzle.cpp. This task can be a little tricky. Focus on answering this one question about a particular tile, location, and direction: if this tile was placed at location, does the edge in this direction match the facing edge of its neighbor? There are a number of different variations to test (different directions, neighbor out of bounds, etc.). Use thePROVIDED_TESTinPuzzle.cppto confirm. -
Once you have completed and tested the
TileandPuzzleclasses, you are now able to try out the game-play works. Try your hand as solving the puzzle manually. At each step, you have to choose which next tile to add. If you find yourself a dead end, remove your last tile added and try again. This manual process can eventually arrive a solution, but yikes, it is tedious! -
Finally, write your recursive
solvefunction inpuzzle-solve.cpp. After manually playing the game for a while, think about how you can translate your actions into code. Your goal is to write a solver that systematically explores all options until it finds a solution. Some hints:- The
addfunction of thePuzzleclass handles where to put the next tile– always the next unfilled location in order of left-to-right, top-to-bottom. The choice your solver will have to make is which tile to add at that location. - When considering a tile to add , be sure to cycle through all rotations to find a possible match.
- The
removefunction of thePuzzleclass can be used to remove the last added tile. This will be used when you need to "unchoose". - Call
updateDisplay()fromPuzzleGUI.hto show the current state of your progress on the GUI. If you update the display after each your "choose" and "unchoose" steps, it will animate the progress of your algorithm so you can follow along. Adding the optionalpauseMsargument pauses after the update. Try a pause of500milliseconds for a nice slow trace. This will be helpful during debugging. - Recall that the solver can be called on starting from a partially-filled puzzle. If there is only one tile left when you get the puzzle, the vector of tiles will only have that one tile in it.
solveshould returnfalseif the starting puzzle cannot be completed using the remaining tiles. The starting puzzle will always contains tiles that are a valid match, but those matches may not work out with the remaining tiles.
- The
Testing
Testing as you go is the name of the game, as always.
Tile.cppandPuzzle.cpphavePROVIDED_TESTs for the functions you will write. You may want to write additional unit tests of your own. Once Tile and Puzzle are completed, you can then use the interactive game play to verify tile rotation and detection that a tile's edges match in the grid.- The best way to test
solve()is to run the program and visually watch the solving in action and confirm the edges match in the final result. - The
puzzlesfolder contains a variety of different puzzles you can use for testing. The folderturtles-annotatedcontains the turtle tiles show above that have the edges annotated. Handy! - Most of the puzzles are size 3x3 but we also included a few smaller grids for
colaandturtles-annotated. Tracing and step-debugging will be easier on these smaller grids. - Note that some of the games have been constructed from photographs of real puzzles (e.g., dog and cola), so the edges don't always line up exactly. Some of the puzzles (e.g., tens and turtles) have been computer-generated, and all edges should line up perfectly.
Extension Ideas
Give "hints" to the player playing live. Modify the game-playing code so that when the user presses the h key (for example), the user gets a hint on the next move. Perhaps the program could point out the correct rotation or choice of which tile to next add.
Print a "list of moves" from start to a solution. Come up with a way to walk a player through the choices from start to solution. One way would be to detail the order the tiles are added and at what rotation, but other options are possible.