1. To
start with obtain a
sufficiently
large Thumbdrive or USB Hard drive (suggest 2 gigs minimum but 8-64
gigs is probably better, and it should already have a primary partition
about 1 gig or so at the very front
of it, if not create one using Disk Management, you can use Section IX. C, Part A - Step A2.
down below to help guide through this, except you'll be creating a 1st
primary partition and not a 2nd one, and you can go ahead and format it
FAT32).
Be sure you’re willing to lose ALL data on this drive.
If you are using a USB Hard drive skip to step #2. If you are using a USB Thumb drive you should use one of the tools here http://www.msfn.org/board/index.php?showtopic=87993&st=17 to format the drive to prep it properly
http://www.boot-land.net/forums/index.php?showtopic=7739 I suggest this tool RMPrepUSB. If you're using Windows Vista/Windows 7, be sure to run this as Administrator (thanks Jaclaz!)

ii. Safely eject the drive then put it back. Then prep it for VistaPE, set the Filesystem for FAT32 or NTFS. Set the Size (1 gig or more suggested, 980 used here for later OS/X dual-boot integration purposes), set the Volume Label. Uncheck Boot as HDD (2PTNS). Select WinPE/Vista v2 bootable and click Prepare Drive. Click OK, OK then it should be ready.

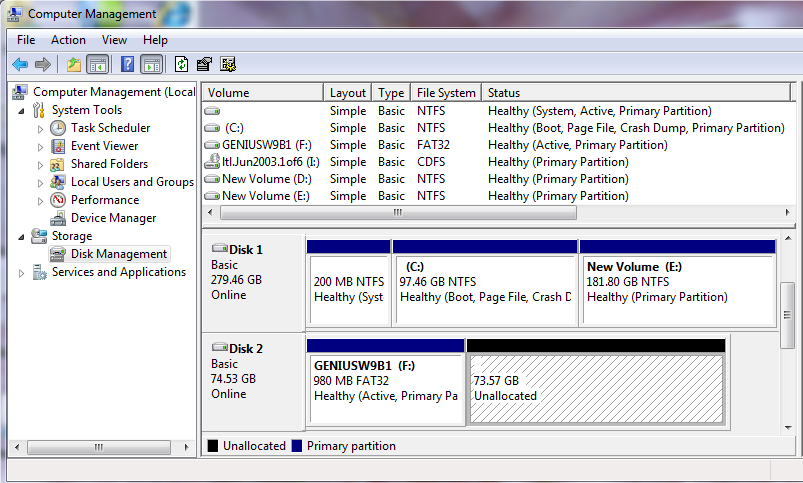
2. Open My Computer then right click and choose Format the drive using FAT32. (PLEASE MAKE SURE YOU SELECT THE RIGHT ONE!) They say you can use NTFS, but I stick with FAT32 for compatibility issues such as MacOS files etc. (see figure for step 3), if you formatted using RMPrepUSB you can skip to 4.
3. Quick format is fine. If you’re using a U2/U3 enabled flash drive like the Sandisk Cruzer’s then you will have to use their utility to remove this feature first then format. (or alternatively if you have a U3 drive that boots an iso image file you can replace the .iso file that it boots u3Custom.iso or something, with the VistaPE-Core.iso file and have it boot that instead, thanks to Jaclaz for this suggestion http://www.msfn.org/board/index.php?showtopic=121502&hl= for more detail). Go ahead and quick format. Capacity can be larger or smaller as you need. I suggest a minimum of 1 gig though. Go ahead and hit Start then OK to format it. Hit Ok when done formatting the Close.
Be sure you’re willing to lose ALL data on this drive.
If you are using a USB Hard drive skip to step #2. If you are using a USB Thumb drive you should use one of the tools here http://www.msfn.org/board/index.php?showtopic=87993&st=17 to format the drive to prep it properly
http://www.boot-land.net/forums/index.php?showtopic=7739 I suggest this tool RMPrepUSB. If you're using Windows Vista/Windows 7, be sure to run this as Administrator (thanks Jaclaz!)
i. First clean the drive of all
partitions. Use the Boot Option\CLEAN USB drive (erase USB drive
partitions) and then hit Prepare Drive. You'll get some warning
messages just hit OK then OK again until it wipes the drive.
ii. Safely eject the drive then put it back. Then prep it for VistaPE, set the Filesystem for FAT32 or NTFS. Set the Size (1 gig or more suggested, 980 used here for later OS/X dual-boot integration purposes), set the Volume Label. Uncheck Boot as HDD (2PTNS). Select WinPE/Vista v2 bootable and click Prepare Drive. Click OK, OK then it should be ready.
2. Open My Computer then right click and choose Format the drive using FAT32. (PLEASE MAKE SURE YOU SELECT THE RIGHT ONE!) They say you can use NTFS, but I stick with FAT32 for compatibility issues such as MacOS files etc. (see figure for step 3), if you formatted using RMPrepUSB you can skip to 4.
Note:
On FAT32
you’re limited to 4 gig max file size if you’re
doing large file transfers/backups. No single file can be any larger
than 4 gigabytes. So no huge ghost or dvd images for instance.
3. Quick format is fine. If you’re using a U2/U3 enabled flash drive like the Sandisk Cruzer’s then you will have to use their utility to remove this feature first then format. (or alternatively if you have a U3 drive that boots an iso image file you can replace the .iso file that it boots u3Custom.iso or something, with the VistaPE-Core.iso file and have it boot that instead, thanks to Jaclaz for this suggestion http://www.msfn.org/board/index.php?showtopic=121502&hl= for more detail). Go ahead and quick format. Capacity can be larger or smaller as you need. I suggest a minimum of 1 gig though. Go ahead and hit Start then OK to format it. Hit Ok when done formatting the Close.
 |
 |
4. Return
to Winbuilder and goto
Finalize\Create ISO/CD/USB and where it says Please select the root
directory of your USB-Device use the folder button to select the
correct drive letter.

5.
On the Browse for Folder dialog
window hit OK then on the Information window hit OK
again (don’t worry it’s not going to format it
again and we can ignore the error message about Windows cannot find
“D:\WinbuilderBLAHBLAHBLAH\HPUSBFW.exe”
 |
 |
6.
Once you hit ok it will start to
copy
the files from the c:\Winbuilder076\Target folder

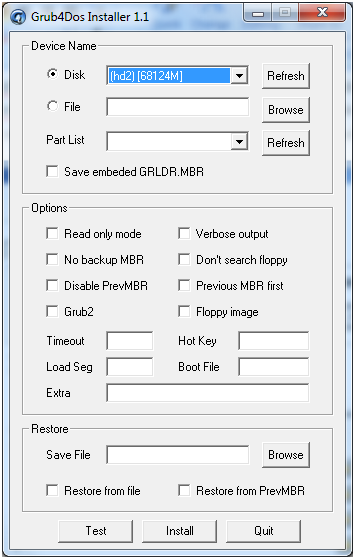
7. Grub4Dos
installing –
Here
again be sure to select the correct disk. Selecting the wrong disk will
result in problems (especially if you choose the primary OS’s
active boot drive). And again I can’t stress this enough.
BE SURE TO SELECT THE
CORRECT DRIVE!
Then hit the Install Button and voila you now have the bootloader installed. And if you’re adventurous you can try tweaking chainloads etc. and add more tools like the XP Recover Disk, DBAN, Parted Magic, other LiveOS’s etc. If you encounter problems installing the Grub4Dos, you may have to use "--skip-mbr-test" (remove quotes) in the Options\Extra field.
Then hit the Install Button and voila you now have the bootloader installed. And if you’re adventurous you can try tweaking chainloads etc. and add more tools like the XP Recover Disk, DBAN, Parted Magic, other LiveOS’s etc. If you encounter problems installing the Grub4Dos, you may have to use "--skip-mbr-test" (remove quotes) in the Options\Extra field.