Student Topic Suggestions
Slide 1
Announcements
- The final exam information has been posted: https://web.stanford.edu/class/archive/cs/cs106a/cs106a.1228/assessments/final-exam/
- Chris needs to move his office hours this week. I will have office hours during the following times:
- Wednesday 11am-12pm
- Thursday 10am-12pm
Slide 2
Today's Topics
- for/while else
- git / github (suggested by R.G.)
- Web scraping using Python (suggested by Anon on Ed and A.H.)
- Reading .csv and Microsoft Excel files (suggested by B.K.)
- Code Optimization (suggested by A.H.)
Slide 3
for/while else
- Another Python feature we are going to look at is another one that I have rarely used, but that can make looping code easier.
- Python is the only language I know of that has an
elseclause for both theforloop and thewhileloop. It is used if you want to do something if your loop exits normally (e.g., when the top-line condition causes the loop to stop). Here is an example:>>> while a < 5: ... print(a) ... a += 1 ... else: ... print("The loop made it without breaking out") ... 0 1 2 3 4 The loop made it without breaking out >>>Here is a converse example:
>>> a = 0 >>> while a < 5: ... print(a) ... a += 1 ... if a == 2: ... break ... else: ... print("The loop made it without breaking out") ... 0 1 >>> - You can also use a similar construct with a
forloop, and it is somewhat more useful. For example, let's say you had a list and wanted to loop through it until you got to a particular value, but stop once you reach that value. If the value isn't in the list, you want to do something else. E.g.,lst = [1, 3, 5, 7, 9] found_val = False for val in lst: if val == 5: print("Found 5!") found_val = True break if not found_val: print("Did not find 5 :(") - This necessitates a boolean
found_val, which is a bit ugly. - Instead, you could do the following:
lst = [1, 3, 5, 7, 9] for val in lst: if val == 5: print("Found 5!") break else: print("Did not find 5 :(") - No more need for the boolean. If the loop exited normally (by going through all the values in
lst), then theelseblock runs. - Note that the choice of the word
elsewas probably a bad one (and the creator of Python has admitted as much). Once you understand it, it is useful, but seeing it in someone elses code (no pun intended) is often somewhat jarring.
Slide 4
git / github (suggested by R.G.)
Have you ever done something like this when writing an important document?
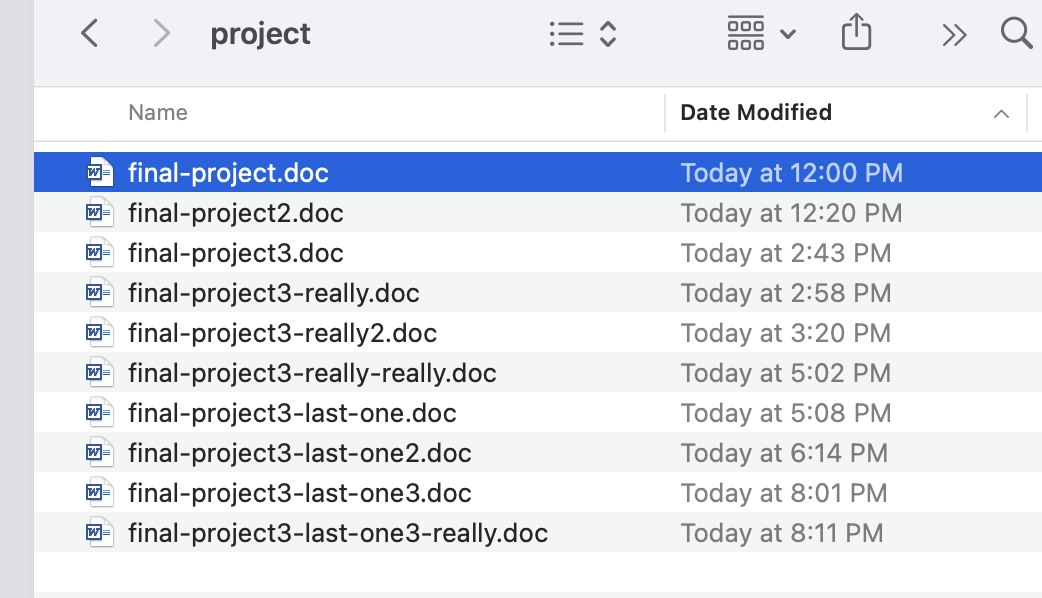
Not only does this waste space on your computer, but it is also an inconvenient and haphazard way to keep different versions of your files. What you really want is a version control system, which is a way to automatically keep track of files so that you can always get past versions and you only have to keep one up to date file at a time.
Version control has been around for about fifty years, although many people still don't use it. It is actually built into Mac computers as "Time Machine," but it isn't turned on by default.
One of the most widely used version control systems is called git, and there is an online hosting service called GitHub that will keep git repositories in the cloud. If you have your files in a git repository and hosted on GitHub (and use them correctly), you are very unlikely to lose any data, and you will always have access to the complete history of your documents. Let's see how to use git and Github.
Let's say that you want to put your CS106A Sand project into version control, and then in a private GitHub repository (note: DO NOT DO THIS IN A PUBLIC REPOSITORY! You are not allowed to publically share CS106A assignments, and we will issue a takedown notice if we find your code online).
There are tools to do this witout going into the Terminal (in fact, PyCharm has the ability to use git), but let's do it manually to show you some details. You do have to install git on your computer.
First, open a Terminal, and then change into your project directory. E.g.,
% cd Downloads/sand
~/Downloads/sand %
Next, initialize a git repository, and add the original files (the . means to add everything in the current directory):
~/Downloads/sand % git init
Initialized empty Git repository in /Users/cgregg/Downloads/sand/.git/
~/Downloads/sand % git add .
Then, you "commit" the original files. Committing means telling git that you want them managed by version control. The -a -m "message" means "commit all the files and create a message about what you've just done."
~/Downloads/sand % git commit -a -m "first commit"
[main (root-commit) 2152353] first commit
 10 files changed, 955 insertions(+)
 create mode 100644 .idea/.gitignore
 create mode 100644 .idea/03-sand.iml
 create mode 100644 .idea/inspectionProfiles/profiles_settings.xml
 create mode 100644 .idea/misc.xml
 create mode 100644 .idea/modules.xml
 create mode 100644 .idea/vcs.xml
 create mode 100644 drawcanvas.py
 create mode 100644 grid.py
 create mode 100644 sand.py
 create mode 100644 waterfall.py
~/Downloads/sand %
Now, we have all of our files in version control in their current form. Let's say we modify sand.py to change the comment near the top of the file:
#!/usr/bin/env python3

"""
Stanford CS106A Sand Project
"""
becomes
#!/usr/bin/env python3

"""
Stanford CS106A Sand Project by Chris Gregg
"""
Next, we can commit the file with the new change:
~/Downloads/sand % git commit -m "added name to header comment" sand.py
[main 166dfa3] added name to header comment
 1 file changed, 1 insertion(+), 1 deletion(-)
~/Downloads/sand %
At this point, we have our updated file, but the original is still saved! We can see the log of all of our changes with git log:
~/Downloads/sand % git log
commit 166dfa371cf8ae08e0bb072e5f6bda7100c4293f (HEAD -> main)
Author: Chris Gregg <tofergregg@gmail.com>
Date:   Tue Aug 9 21:11:04 2022 -0700

    added name to header comment

commit 21523538d7b69f10661a5644927c1dd9fa86c1fb
Author: Chris Gregg <tofergregg@gmail.com>
Date:   Tue Aug 9 21:05:32 2022 -0700

    first commit
If we want to see the difference between two revisions, we can use that long hex number (we only need part of it, actually) to make the comparison:
~/Downloads/sand % git diff 166dfa3 21523
diff --git a/sand.py b/sand.py
index 8904ee6..f0151a8 100644
--- a/sand.py
+++ b/sand.py
@@ -1,7 +1,7 @@
 #!/usr/bin/env python3

 """
-Stanford CS106A Sand Project by Chris Gregg
+Stanford CS106A Sand Project
 """

 import sys
This shows us that we added by Chris Gregg to the file.
There are lots and lots of git commands, which allow you to change to previous verisons, or create temporary versions, etc. I have a number of commands that I've memorized, but I look them up when I need something out of the ordinary (for example, if I want to go back to a prior file permanently).
Now, let's store our repository on GitHub. If you create a GitHub user at https://github.com, then you can create repositories. Remember, create a private one if you want to store a CS106A assignment!
Once you create an account and a new repository, GitHub shows you how to "push" your repository to the service. E.g.,
git remote add origin git@github.com:tofergregg/106a-sand.git
git branch -M main
git push -u origin main
Now you can see it on GitHub:

If you make more changes to files, you should commit and then push them:
~/Downloads/sand % vim waterfall.py
~/Downloads/sand % git commit -m "finished waterfall.py" waterfall.py
[main 0256f8f] finished waterfall.py
 1 file changed, 1 insertion(+), 1 deletion(-)
~/Downloads/sand % git push
Enumerating objects: 5, done.
Counting objects: 100% (5/5), done.
Delta compression using up to 8 threads
Compressing objects: 100% (3/3), done.
Writing objects: 100% (3/3), 303 bytes | 303.00 KiB/s, done.
Total 3 (delta 2), reused 0 (delta 0), pack-reused 0
remote: Resolving deltas: 100% (2/2), completed with 2 local objects.
To github.com:tofergregg/106a-sand.git
   166dfa3..0256f8f  main -> main
~/Downloads/sand %
Now, you've got all of your code saved online! Later, if you want to download a fresh copy somewhere else, you can do that, too (but first you will need to create a "personal access token" for private repositories:
git clone https://github.com/tofergregg/106a-sand.git
Cloning into '106a-sand'...
Username for 'https://github.com': tofergregg
Password for 'https://tofergregg@github.com':
remote: Enumerating objects: 20, done.
remote: Counting objects: 100% (20/20), done.
remote: Compressing objects: 100% (14/14), done.
remote: Total 20 (delta 4), reused 20 (delta 4), pack-reused 0
Receiving objects: 100% (20/20), 10.58 KiB | 5.29 MiB/s, done.
Resolving deltas: 100% (4/4), done.
Slide 5
Web scraping using Python (suggested by Anon on Ed and A.H.)
There is a lot of data on web pages, and sometimes you just want to get that data off of the web page so you can use it. This is called "web scraping," and there are many different ways to do it. There is a Python library called "Beautiful Soup" which lets you use Python to scrape data from web pages. First, you need to install it:
% pip3 install beautifulsoup4
There are lots of tutorials online that teach you how to use Beautiful Soup, but let's go through a simple example modified from tutorialspoint.com. We will skip all of the technical information about HTML (the markdown language web pages are built with). Here is some Python code to get the title of our class website:
>>> from bs4 import BeautifulSoup
>>> import requests
>>> url = "https://web.stanford.edu/class/cs106a/index.html"
>>> req = requests.get(url)
>>> soup = BeautifulSoup(req.text, "html.parser")
>>> print(soup.title)
<title>  CS106A Home</title>
>>>
If we want to get all of the links from our CS106A page that have "section" in the link, we can do that like this:
>>> for link in soup.find_all('a'):
...    href = link.get('href')
...    if 'section' in href:
...        print(href)
...
/class/archive/cs/cs106a/cs106a.1228/about_section
/class/archive/cs/cs106a/cs106a.1228/section/section1/
/class/archive/cs/cs106a/cs106a.1228/section/section2/
/class/archive/cs/cs106a/cs106a.1228/section/section3/
/class/archive/cs/cs106a/cs106a.1228/section/section4/
/class/archive/cs/cs106a/cs106a.1228/section/section5/
/class/archive/cs/cs106a/cs106a.1228/section/section6/
/class/archive/cs/cs106a/cs106a.1228/section/section7/
>>>
What if we wanted to get all the images from the matplotlib lecture, and download them?
>>> from bs4 import BeautifulSoup
>>> import requests
>>> import shutil
>>> url = "https://web.stanford.edu/class/cs106a/lectures/22-matplotlib/slides"
>>> req = requests.get(url)
>>> soup = BeautifulSoup(req.text, "html.parser")
>>> for link in soup.find_all('img'):
...    src = link.get('src')
...    name = src[src.rfind('/') + 1:]
...    print(name)
...    r = requests.get(url+'../../'+src, allow_redirects=True, stream=True)
...    with open(name, 'wb') as f:
...        shutil.copyfileobj(r.raw, f)
...
matplotlib-simple.png
matplotlib-multiple-plots.png
matplotlib-reading-scores.png
matplotlib-reading-and-math-scores.png
>>>
Slide 6
Reading .csv and Microsoft Excel files (suggested by B.K.)
We have seen how to manually read .csv files already in class. There is a csv Python library that makes it easy to read in more complicated comma-separated files (e.g., ones that have commas in fields). Here is an example:
my_data.csv:
name,age,birth_year
"Streep, Meryl",1949
"Di Nero, Robert",1943
"Clooney, George",1961
"Davis, Viola",1965
"Hayek, Salma",1966
"Bullock, Sandra",1964
Here is some code to read this so that it properly reads in the two fields:
>>> import csv
>>> with open("a-list-celebs.csv") as f:
...     reader = csv.reader(f, delimiter=',', quotechar='"')
...     next(reader)
...     for row in reader:
...         print(f"{row[0]} was born in {row[1]}")
...
['name', 'age', 'birth_year']
Streep, Meryl was born in 1949
Di Nero, Robert was born in 1943
Clooney, George was born in 1961
Davis, Viola was born in 1965
Hayek, Salma was born in 1966
Bullock, Sandra was born in 1964
You can learn more about the csv module here
If you want to analyze Microsoft Excel files, the easiest way to do it is to use the pandas library with the openpyxl library:
pip3 install pandas openpyxl
>>> import pandas as pd
>>> data = pd.read_excel('my_spreadsheet.xlsx')
>>> print(data) # or do something else with the data
There is a nice tutorial here about how to do this for an advanced Excel spreadsheet with multiple sheets, etc.
Slide 7
Code Optimization (suggested by A.H.)
This is actually a huge topic, and we don't have time to get into many details here. But, in general, optimizing your code involves at least the following:
- Understanding how your data structures or algorithms behave as they handle more data, and choosing the right data structures.
- Understanding what makes a program or loop slow.
- Testing different versions of your code by timing it.
For (1) above, we've already talked about how it is often better to use a dictionary than a list, if you want to search through the data. For a list, you must search through each element one at a time, which is slow, but for dictionaries, you can instantly find a key. In CS106B, you will spend lots of time thinking about these kinds of optimiztions.
For (2) and (3), this is often demonstrated best with an example. Here is some code that calculates the factorial of the numbers 5000 to 5100, and prints out how many digits each factorial has, as well as the first digit in the factorial:
# optimize1.py
def factorial(n):
    result = 1
    while n > 1:
        result *= n
        n -= 1
    return result

def get_first_digit(n):
    while n >= 10:
        n = n // 10
    return n

def main():
    begin = 5000
    for i in range(begin, begin + 100):
        len_fact = len(str(factorial(i)))
        first_digit = get_first_digit(factorial(i))
        print(f'factorial({i}) has {len_fact} digits, and the first digit is {first_digit}.')

if __name__ == "__main__":
    main()
We can run and time this as follows:
% time python3 optimize1.py
factorial(5000) has 16326 digits, and the first digit is 4.
factorial(5001) has 16330 digits, and the first digit is 2.
factorial(5002) has 16334 digits, and the first digit is 1.
factorial(5003) has 16337 digits, and the first digit is 5.
factorial(5004) has 16341 digits, and the first digit is 2.
factorial(5005) has 16345 digits, and the first digit is 1.
factorial(5006) has 16348 digits, and the first digit is 6.
...
factorial(5095) has 16678 digits, and the first digit is 2.
factorial(5096) has 16682 digits, and the first digit is 1.
factorial(5097) has 16685 digits, and the first digit is 6.
factorial(5098) has 16689 digits, and the first digit is 3.
factorial(5099) has 16693 digits, and the first digit is 1.
python3 optimize1.py  9.38s user 0.06s system 98% cpu 9.568 total
This is pretty slow! We're doing a lot of work. Can we make it better? Let's first see if we can make the factorial part better. What are we doing that is slow when calculating all of those factorials?
We're calculating the factorial twice! Let's just save that value once and use it twice:
# optimize2.py
def factorial(n):
    result = 1
    while n > 1:
        result *= n
        n -= 1
    return result

def get_first_digit(n):
    while n >= 10:
        n = n // 10
    return n

def main():
    begin = 5000
    for i in range(begin, begin + 100):
        fact = factorial(i)
        len_fact = len(str(fact))
        first_digit = get_first_digit(fact)
        print(f'factorial({i}) has {len_fact} digits, and the first digit is {first_digit}.')

if __name__ == "__main__":
    main()
When we run this, we get the same output, but the time is better!
...
python3 optimize2.py  8.47s user 0.06s system 98% cpu 8.672 total
Can we do even better? What does it mean to calculate the "next" factorial? It is just the last number times the prior factorial. We're re-calculating from the beginning each time! Let's just start with the first factorial (well, one less than the first factorial), and just keep multiplying by the next number each time through the loop:
# optimize3.py
def factorial(n):
    result = 1
    while n > 1:
        result *= n
        n -= 1
    return result

def get_first_digit(n):
    while n >= 10:
        n = n // 10
    return n

def main():
    begin = 5000
    fact = factorial(begin - 1)
    for i in range(begin, begin + 100):
        fact = fact * i
        len_fact = len(str(fact))
        first_digit = get_first_digit(fact)
        print(f'factorial({i}) has {len_fact} digits, and the first digit is {first_digit}.')

if __name__ == "__main__":
    main()
When we time it, we do better!
python3 optimize3.py 7.55s user 0.04s system 99% cpu 7.655 total
It's still kind of pokey, though. Let's keep investigating. That conversion to string is pretty suspect. It's slow to convert to a string. Can we do the calculation mathematically, instead of bothering with a string? We can! If you remember your logarithms (I know!), you'll find that log base 10 almost gives you the number of digits:
log10(1) = 0.0
log10(2) = 0.3010299956639812
log10(3) = 0.47712125471966244
log10(9) = 0.9542425094393249
log10(10) = 1.0
log10(11) = 1.0413926851582251
log10(50) = 1.6989700043360187
log10(99) = 1.99563519459755
log10(100) = 2.0
log10(444) = 2.6473829701146196
log10(1000) = 3.0
log10(2000) = 3.3010299956639813
log10(20000) = 4.301029995663981
If you take the floor of the log10 and then add one, you do get the correct values!:
floor(log10(1)) + 1 = 1
floor(log10(2)) + 1 = 1
floor(log10(3)) + 1 = 1
floor(log10(9)) + 1 = 1
floor(log10(10)) + 1 = 2
floor(log10(11)) + 1 = 2
floor(log10(50)) + 1 = 2
floor(log10(99)) + 1 = 2
floor(log10(100)) + 1 = 3
floor(log10(444)) + 1 = 3
floor(log10(1000)) + 1 = 4
floor(log10(2000)) + 1 = 4
floor(log10(20000)) + 1 = 5
So, we can change our code to:
# optimize4.py
import math

def factorial(n):
    result = 1
    while n > 1:
        result *= n
        n -= 1
    return result

def get_first_digit(n):
    while n >= 10:
        n = n // 10
    return n

def main():
    begin = 5000
    fact = factorial(begin - 1)
    for i in range(begin, begin + 100):
        fact = fact * i
        len_fact = math.floor(math.log10(fact)) + 1
        first_digit = get_first_digit(fact)
        print(f'factorial({i}) has {len_fact} digits, and the first digit is {first_digit}.')

if __name__ == "__main__":
    main()
When we time it, we do better!
python3 optimize4.py 7.09s user 0.03s system 99% cpu 7.165 total
Is there anything else we can do? Well…it turns out that division is one of the slowest things a computer can do. We have lots of divisions in that get_first_digit() function! Can we simplify it? We can use our log10 again! What is the get_first_digit() function doing? It's dividing by 10 until we get a number less than 10. What if we could figure out how many times to divide by and just do one division? It's just ten to the power of the number of digits minus one! (e.g., 10**(len_fact - 1):
# optimize5.py
import math

def factorial(n):
    result = 1
    while n > 1:
        result *= n
        n -= 1
    return result

def get_first_digit(n):
    while n >= 10:
        n = n // 10
    return n

def main():
    begin = 5000
    fact = factorial(begin - 1)
    for i in range(begin, begin + 100):
        fact = fact * i
        len_fact = math.floor(math.log10(fact)) + 1
        first_digit = fact // (10**(len_fact - 1))
        print(f'factorial({i}) has {len_fact} digits, and the first digit is {first_digit}.')

if __name__ == "__main__":
    main()
When we run this…our program screams! Less than a tenth of a second! Wow! Division is slow!
python3 optimize5.py 0.07s user 0.01s system 89% cpu 0.088 total
Here are all the times together (and remember, each time we test, we will get slightly different results:
% for i in $(seq 1 5); do printf "$i: "; time python3 optimize$i.py > /dev/null; done

1: python3 optimize$i.py > /dev/null  9.28s user 0.03s system 99% cpu 9.350 total
2: python3 optimize$i.py > /dev/null  8.37s user 0.03s system 99% cpu 8.441 total
3: python3 optimize$i.py > /dev/null  7.48s user 0.02s system 99% cpu 7.529 total
4: python3 optimize$i.py > /dev/null  7.08s user 0.02s system 98% cpu 7.196 total
5: python3 optimize$i.py > /dev/null  0.06s user 0.00s system 94% cpu 0.070 total