Slide 1
Announcements
- Your next quiz will be next Wednesday (not Monday as originally on the schedule)
- Topics will cover up to and including drawing.
Slide 2
Today: advanced double-while parsing, flex-arrow drawing example
Slide 3
at_word() - Need a Little More Power
We've done them like this:
  at    end
   v----v
xx @word xx
- 1. s.find() to locate the
'@' - 2. While loop over alpha to find end of
'word' - Problem with this approach:
The'@'is kind of a crutch here. More realistic would be that we just find the word itself, floating among other chars. - We can do this with two while loops
- Can call this a ♥ / not ♥ system
- ♥ - chars we want
- not ♥ - chars we don't want (skip over)
Slide 4
find_alpha()
I will work this one in lecture with the double-while technique. Then we'll have you try to solve a similar one. (HW5)
find_alpha(s): We'll say a word is made of 1 or more alphabetic chars.
Find and return the first word in s, or None if there is none. So
'%%%abc xx' returns 'abc'. Use two while loops.
Slide 5
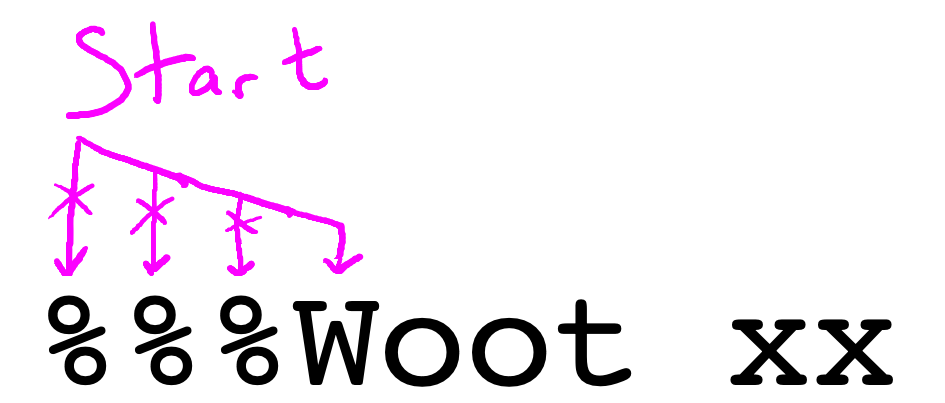
find_alpha() Plan
1. Skip over the '%' to find the 'W'
2. Then find the end of the series of alpha
%%%Woot xx
Slide 6
find_alpha() - Loop 1
- Variable
start- will point to first alpha char - Init:
start = 0 - Loop: advance start to first char
- What is the loop test?
- Draw start pointing to first
'%'.. when should it advance? - Say that we ♥ the alpha chars .. so what do we skip over?
Slide 7
Loop 1 Test
%%%Woot xx
- Skip over the non-alpha chars, aka not ♥ chars
- Therefore test = if not alpha char
- In Python:
not s[start].isalpha() - Need the
start < len(s)guard as usual
    # Advance start to first alpha
    start = 0
    while start < len(s) and not s[start].isalpha():
        start += 1
Slide 8
find_alpha() Loop 2
- Variable:
end- points to first non-alpha char after start - Init:
end = start + 1 - Loop2 - advance end past alpha
Slide 9
Loop 2 Test
%%%Woot xx
- Skip over alpha chars, aka skip over ♥ chars
- Therefore test = if alpha char
- Advance end if pointing to an alpha char
- In Python:
s[end].isalpha() - Then the slice is easy:
startis first char
endis 1 past last char
So:s[start:end]
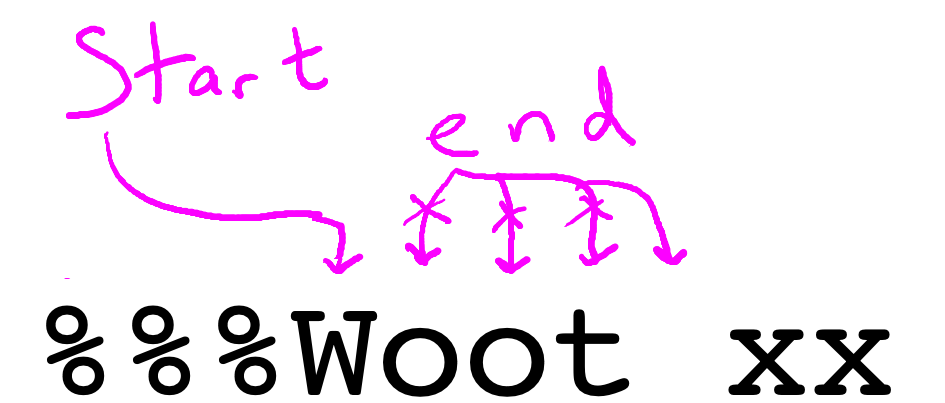
Slide 10
Completed Drawings
Slide 11
Code It Up And Run
Slide 12
Issue: What if there is no alpha?
Q: Suppose there is no alpha. What will start be after loop 1? What is
the if-check for that case?
Reminder: here is the loop-1 code:
while start < len(s) and not s[start].isalpha():
   start += 1
Sketch out what start does for the no-alpha case:
'%%%'
 0123
Slide 13
Solution: Detect No-Alpha
    if start == len(s):
        return None
Slide 14
find_alpha() Solution Code
def find_alpha(s):
    # Advance start to first alpha
    start = 0
    while start < len(s) and not s[start].isalpha():
        start += 1

    # There was no word
    if start == len(s):
        return None

    # Advance end past alpha chars
    end = start + 1
    while end < len(s) and s[end].isalpha():
        end += 1

    return s[start:end]
Slide 15
You Try One - find_num()
Here is a very similar problem on the experimental server. See if you can write the code for it. You can peek at the lecture example above if you need to.
find_num(s): We'll say that a number is a series of one or more digit
chars. Find and return the substring of the first num in s, or None if
there is none.
Slide 16
find_num() Solution
def find_num(s):
    # Advance start to first digit
    start = 0
    while start < len(s) and not s[start].isdigit():
        start += 1

    # There was no num
    if start == len(s):
        return None

    # Advance end past digits
    end = start + 1
    while end < len(s) and s[end].isdigit():
        end += 1

    return s[start:end]
Slide 17
Flex Arrow Example
Download the flex-arrow.zip to work this fun little drawing example.
Slide 18
Drawing - Float Is Ok
- To use
image.get_pixel(x, y) x,yhad to be intdraw_line()etc. not so picky- If you give them
x = 8.33 - It truncates to
x = 8internally - Visually you can't tell
- In the HW .. at times we'll ask you use int division to be perfectly clear about an x value
x = 0
y = 0
width = 200
x2 = x + width

# this is fine
canvas.draw_line(x, y, x2, y)

# this is fine too
# draw a line 2/3 as long
# note that x3 is not an int
x3 = x + width * 0.66
canvas.draw_line(x, y, x3, y)
Slide 19
Draw Arrow Output
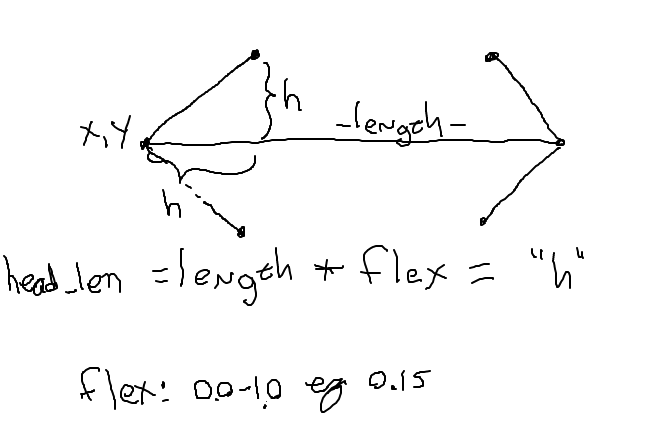
Ultimately we want to produce this output:

The "flex" parameter is 0..1.0: the fraction of the arrow's length used for the arrow heads. The arms of the arrow will go at a 45-degree angle away from the horizontal.
Slide 20
Starter Code: Left Arrow + flex
Specify flex on the command line so you can see how it works. Close the window to exit the program. You can also specify larger canvas sizes.
$ python3 flex-arrow.py -arrows 0.25
$ python3 flex-arrow.py -arrows 0.15
$ python3 flex-arrow.py -arrows 0.1 1200 600
Slide 21
draw_arrow() Starter Code
Look at the draw_arrow() function. It is given x,y of the left endpoint of the arrow and the horizontal length of the arrow in pixels. The "flex" number is between 0 .. 1.0, giving the head_len - the horizontal extent of the arrow head - called "h" in the diagram. Main() calls draw_arrow() twice, drawing two arrows in the window.
The code here draws the left arrow head.
def draw_arrow(canvas, x, y, length, flex):
    """
    Draw a horizontal line with arrow heads at both ends.
    It's left endpoint at x,y, extending for length pixels.
    "flex" is 0.0 .. 1.0, the fraction of length that the arrow
    heads should extend horizontally.
    """
    # Compute where the line ends, draw it
    x_right = x + length - 1
    canvas.draw_line(x, y, x_right, y)

    # Draw 2 arrowhead lines, up and down from left endpoint
    head_len = flex * length
    canvas.draw_line(x, y, x + head_len, y - head_len)  # up
    canvas.draw_line(x, y, x + head_len, y + head_len)  # down

    # Draw 2 arrowhead lines from the right endpoint
    # your code here
    pass
Slide 22
Exercise - Right Arrowhead
Look at the diagram below. Add the code to draw the head on the right
endpoint of the arrow. The head_len variable "h" in the drawing.
This is a solid, CS106A applied-math exercise.
Slide 23
draw_arrow() Solution
    # Draw 2 arrowhead lines from the right endpoint
    # your code here
    pass
    canvas.draw_line(x_right, y, x_right - head_len, y - head_len)  # up
    canvas.draw_line(x_right, y, x_right - head_len, y + head_len)  # down
Slide 24
Observations
- Classic applied math with visual output
Params: x, y, length, flex
Our code just uses those numbers - Note we are feeding floating point values into draw_line() and it's fine
Slide 25
A Little Something Extra
Now we're going to show you something a little beyond the regular CS106A level, and it's a teeny bit mind warping.
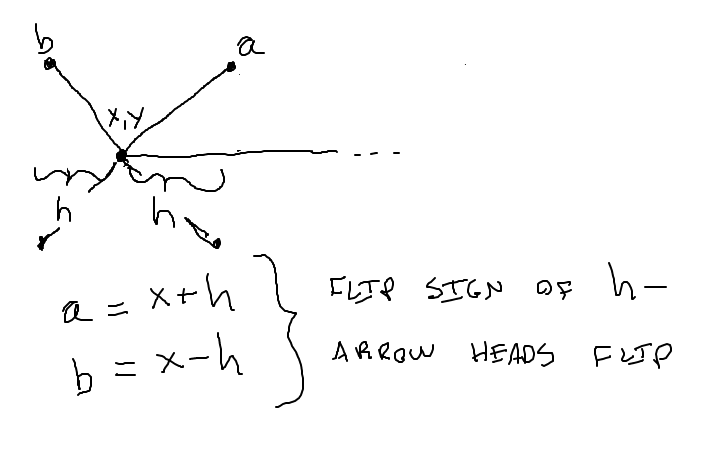
Slide 26
Arrow Trick Mode
- Suppose we multiplied "h" by -1?
Or equivalently, swapped the addition/subtraction in the code - Look at the code that computes the x values
- Instead of the arrow head going in, it goes out
- Your code will do this
If we pass in flex as -0.2 instead of 0.2
Slide 27
-trick Mode
Run the code with -trick like this, see what you get.
$ python3 flex-arrow.py -trick 0.1 1200 600
- This is using your same draw_arrow() code
- Draws the top arrow normally
- For the second arrow, it multiplies flex by -1
- e.g. flex of 0.2 becomes flex -0.2
- Constructs the Muller-Lyer illusion!
- The horizontal lines are the same length
But is sure doesn't look like it - The two horizontal lines are drawn by the same draw_line() code
- This is Eric Roberts' example idea - retired Stanford CS Professor
- The "flex" * -1 idea is Nick Parlante's CS106A parameter technique for it