Introduction History Process Thank Yous


Forming the Heads (the First Stretch)

The process to make the head of a taiko usually involves a first and second soak, each followed by what are often called the first and second stretches. However, the "first stretch" is misleading, because while it uses the stretching equipment, the goal is not to stretch the drum tightly, but to form the skin into the shape of a drum head. The real stretching to tighten the head is done in the second stretch.

Therefore, the goal of this stage is not to get a nice, high pitched drum right away: since you will be taking the head off after it dries, any tension on the head will be lost anyway. Instead, focus on making sure the skin lies evenly across the drum head and is under even tension on all sides. The skinning stand used by Zenshin Daiko differs from the most common style of stand, but it makes control over the tension in the head very easy. This guide assumes you have something similar to the Zenshin stand.

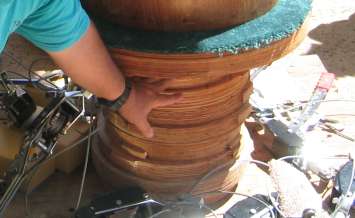
  • Stack up enough plywood in the center to get the drum to the appropriate height for stretching. Add on the carpeted disk and then place the drum on top. Make sure everything is centered and stable.

    Adjusting Base

  • Use paraffin wax to wax the top rim of the barrel (put it everywhere where the skin will make contact). This will help the skin to slide over the lip more easily, so that the tension stays in the head, instead of just stretching the sides of the drum.

    Waxing Edge

  • Dry off the skin with a towel before placing the head on the barrel.
  • Line up the grease pencil line with the rim of the barrel. As the head is stretched, the goal is to keep the mark centered with the rim of the barrel: use it as a guide to see if one side is being stretched too far or if the skin is off-center.
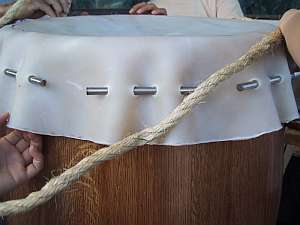
  • Weave rods (3/8" diameter stainless steel rods, 5 3/4" long) into the mimi holes.

    Rods Inserted

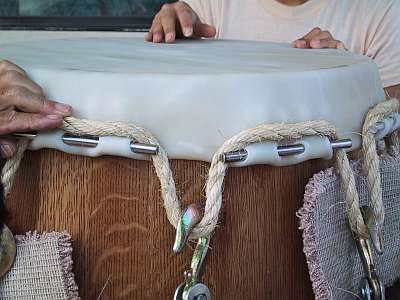
  • Weave the looped rope around the drum: the rope rests on top of the rods, dropping a loop down between each one.

    Rope Threaded

  • Align the loops of rope between each mimi with the eye bolts on the base of the skinning stand.
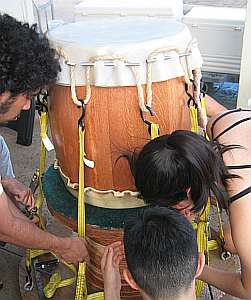
  • Hook the ratchet hoists from each eye bolt to the loops of rope at the top. Make sure the hoists are not upside-down. Put small pieces of carpet (soft side towards the drum) between the hooks and drum body to protect the drum.

    Hooking up Ratchets
    Using nylon belt ratchet hoists

  • Ratchet opposite sides at the same time to the skin stretches evenly and stays centered. Be careful when ratcheting! Heavy duty ratchets are very strong: it does not take much effort to crank them, but they really tighten up. Keep an eye on the head of the drum to know when to stop, because it won't be easy to tell from how hard it is to crank the ratchets.
  • When the head is under light and even tension, tuck the extra flap of skin under around the entire drum so that the folded edge is aligned with the bottom edge of the mimi (tuck it under as far as possible). If the skin is not folding under a mimi easily, use a small wedge of wood or a scrap piece of rawhide and stick it under the mimi to hold the skin in place.

    Skin Tucked Under

  • Tighten the head some more. Again, make sure it is centered! Check to make sure the mimi are horizontal, and that they are stretched down a relatively even amount (some will be pulled further down than others).

    Straightening Dowels by hand
    Straightening dowels by hand

  • Leave the drum in the skinning stand under tension for a week to dry.

    Skinning Stand with Taiko

  • Before removing the head from the drum, mark which head corresponds to which side of the body and how it is aligned and oriented; don't forget to mark the barrel as well. This is important, because once the head is formed, it is molded to a particular drum. If it is used on another head, it probably won't fit, and may rip when stretched.

Back


Drum manual written by Alix Koyama and Dylan Solomon.
Please visit the Acknowledgements page to see the many people who helped us with this project.