CARE and FEEDING of the
Net MD MiniDisc Recorder
What follows are simple
instructions of how to use the Net MD MiniDisc Recorder. For more detailed information
please consult the manual
for the MiniDisc Recorder.
Its important that you bring
back the MiniDisc Recorder to FSP, with your recorded MiniDisc, so we can
archive your recording, so please don't try to transfer the recording to
your own computer. An FSP ATS will do this for you, and provide these to
you on a CD or as mp3 files, so you can incorporate them into your multimedia
presentation as you wish.
Its ALSO important that
you bring back MiniDisc FULLY RECHARGED. This is why we have included
the battery recharger with the MiniDisc, so please consult
the instructions at the end of this document which detail how to recharge it.
HOW DO I START RECORDING
WITH THE MINIDISC?
 Its
as simple as clicking the record button on the front face of the MiniDisc Recorder,
but before you get started, you have to label and insert your blank MiniDisc,
plug in the remote, headphones, and microphone and even make a test.
Its
as simple as clicking the record button on the front face of the MiniDisc Recorder,
but before you get started, you have to label and insert your blank MiniDisc,
plug in the remote, headphones, and microphone and even make a test.
- Put your name, SUNET
ID, email and Professor's Name on a blank MiniDisc before you record it, so
there is no confusion about whose tape is whose.
- Click the Open button
on the left side of the Recorder, and insert your blank MiniDisc by
matching up the downward pointing arrow on the tape with the slot. Its
not a square tape, and should require no force to be inserted, so be
careful. It can easily be broken.
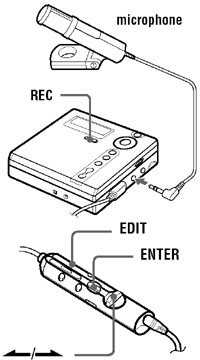
- Plug the cylindrical
remote into the headphone jack on the right side of the MiniDisc Recorder,
and the headphones into the end of the remote, so you can test the recording
levels when you start recording. These are automatically balanced, but its
always worth checking that some hum isn't going to ruin everything later.
- Plug the microphone
into the red "mic" jack and push the record button on the front
of the MiniDisc Recorder. Once you are satisfied with the levels, push stop
and delete the test.
HOW DO I DELETE A TRACK?
 There
are not very many buttons on the NET MD MiniDisc Recorder, so a crucial element
of the user interface is context. In order to erase a track, therefore,
you must already be playing that track when you click on the Menu button, or
else the option to erase will not be available.
There
are not very many buttons on the NET MD MiniDisc Recorder, so a crucial element
of the user interface is context. In order to erase a track, therefore,
you must already be playing that track when you click on the Menu button, or
else the option to erase will not be available.
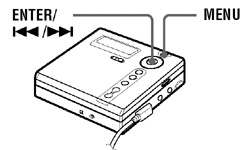
- Click to the right
or left to scroll forward or backward through the TOC (Table of Contents,
which will in all likelihood simply be a sequence of automatically generated
numbers) and in the exact center of the Play button to play a track.

While the track is playing, click on MENU button above the play button,
and select EDIT (your first choice) by clicking on the exact center of the
button again. The first suboption is Name, then Move, and third is ERASE.
If you select ERASE by clicking the exact center of the Play Button twice
(once to choose the option and once to confirm that it is OK to erase it),
you will erase the track. NOTE: If you get lost in the menu, the menus
will eventually scroll around by simply repeat clicking the button, or you
can always CANCEL by simply clicking on the button immediately below the big
play button and just start over.
HOW DO I AUTOMATICALLY
GENERATE TRACKS AT 5 minute INTERVALS or SWITCH FROM STEREO TO MONO?
Some of you will be recording
long pieces, which will be difficult to fast forward through later, if you don't
have track marks laid down at regular intervals beforehand. It is always possible
to create a track mark by simply clicking on the T Mark button (on either the
front face or the remote keypad), and because you already know how to erase
a track, in effect you can throw out any section of the recording. DON'T BOTHER
doing this, however: the interface is much clumsier than those available on
even the most primitive software packages, and you can do this all later when
you're working with your recording on a computer. Only a few key features need
be implemented to successfully record your material.

- AUTOMATICALLY GENERATED
TRACKS AT 5 minute intervals: While you are recording, click on MENU,
and then scroll through the options by clicking on the right side of the big
button until you reach TIME MARK. Press the exact center of the big button
to select this option and scroll to the right from "OFF" to "5min.
ON." Select suboption by clicking on the exact center of the big button.

- SWITCH FROM STEREO
TO MONO: The Net MD is set to MONO and should probably stay there,
because this doubles the recording time (from 80 to 160 minutes) without degrading
the quality (except that you don't have the STEREO). So, if for some crucial
reason, you want the recording to alternate say, between two voices predominately
on the left or the right, you will have to change the REC MODE to STEREO.
This can be done simply by clicking on the MENU, scrolling to REC MODE, selecting
this option, and then scrolling through LP2 and LP4 (two compressed Long Play
Recording Modes that degrade the quality in exchange for doubled or quadrupled
length) to STEREO. PLEASE RESTORE the default MONO mode after you are done.
HOW DO I BEST SITUATE
THE MICROPHONE FOR RECORDING?
The microphone is VERY SENSITIVE,
and cannot be left where it can fall, or even simply rotate or rub on cloth,
or be even open to any wind. A steady light breeze can ruin an entire recording,
to say nothing of air conditioners or construction work. this is why you should
always listen to at least one test recording first before you record an entire
track of a performance or anything for that matter. What follow are therefore
simply guidelines for improving your recordings.
- Hang the microphone
from anything as near as possible to the speaker, performance, ambient
sound you wish to record, etc. It may spin some, but it will usually settle,
and one of the reasons to NOT record in Stereo is that it is very difficult
to control how a hanging microphone will remain for the duration of a long
recording. If it swings or spins in Mono it will be a much less disruptive
experience than in Stereo.
- Clip the microphone
to a larger object, like a book or a shoe or a music stand or a lampshade
that you can guarantee won't be touched or moved again.
- If you must clip it to
a speaker, the speaker will have to carry the MiniDisc (without the recharger,
headphones, or remote, please) in a breast pocket (a pants pocket will
pull as the person walks and cause even more distortion than the breast pocket).
This isn't a lapel mike, so its actually better to clip it to the breast
pocket itself, or wherever less cloth is likely to rub across it. Unfortunately,
you may pick up the sound of the MiniDisc recorder's own motors if you
eliminate the mike cord and simply leave the mike sticking straight out of
the mic jack, so get it just an inch or so away to be safe. In fact, the
best recordings can be made by clipping the mic to a stable object on the
head of a speaker (but only if they have manageable hair that won't brush
the mike, or a secure cap, hat or hairclip, or even a barette (the thing is
small it can be clipped to the earclip of glasses even) This might look weird,
but it will sound better later, so long as the speaker does not wildly gesture
with his or her head.
HOW
DO I RECHARGE THE BATTERY?
Simply by plugging the recharger
in to a wall socket and setting the MiniDisc Recorder on the Recharger Stand.
This is the preferred way of using the MiniDisc Recorder in all situations where
the recorder does not need to be moved, and in most cases you will NOT want
to move the recorder, because the slightest wind or friction on the microphone
produces white noise and pops. Please RETURN the MiniDISC fully recharged.