CARE and FEEDING of the
Digital ELPH
What follows are simple
instructions of how to use the ELPH. For more detailed information please consult
the online Quick
Guide or the manual
for the Digital Elph.
Its important that you bring
back the camera to FSP, with the original Compact Flash Card, so we can
archive all of the images, so please don't try to transfer the images to
your own computer. An FSP ATS will do this for you, and put them online
in a gallery--which you and your classmates can view as you wish.
Its ALSO important that
you bring back the battery FULLY RECHARGED and in the camera, which is
why we have included the battery recharger with the ELPH, so please
consult the instructions at the end of this document which detail how to do
this
HOW DO I START TAKING
PHOTOS WITH THE ELPH?
Turn it on, switch it to
Camera mode, and make sure its set on Auto.
 1.
TURN IT ON:The
on/off button is on top of the camera, and even if you have already
turned it on, you may have to do so again, because it automatically
turns itself of to save the (not as hardy as a larger camera's) battery. 1.
TURN IT ON:The
on/off button is on top of the camera, and even if you have already
turned it on, you may have to do so again, because it automatically
turns itself of to save the (not as hardy as a larger camera's) battery. |
 2.
SWITCH IT TO CAMERA MODE: There is another switch on the back (top
right) which must be switched all the way to the right to take pictures. 2.
SWITCH IT TO CAMERA MODE: There is another switch on the back (top
right) which must be switched all the way to the right to take pictures.
NOTE: If you don't see an image in the viewfinder screen on the
back of the camera, push the DISP (display) button, which is third from
the left just below the viewfinder screen. In order to extend the life
of the battery it is possible to not use this screen, and frame your
photos by simply looking through the circular rangefinder (above the
screen), but you won't be sure you have taken a photo until you turn
it back on and check (see "viewing your images" below) and
can also cause much confusion for the next student if you leave the
display off, so just leave the display on permanently. |
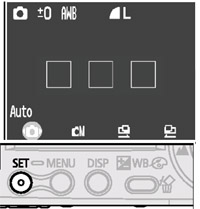 3.
MAKE SURE ITS SET ON AUTO: Similarly, by default the camera is set
to AUTO, but if your pictures are not coming out well (overexposed or
blurry, for example) someone might have left the camera in MANUAL mode.
Just push the SET button (in the lower left, below the viewfinder screen)
and navigate to Auto mode by clicking on the button to the left button
of the 4 around the green light. 3.
MAKE SURE ITS SET ON AUTO: Similarly, by default the camera is set
to AUTO, but if your pictures are not coming out well (overexposed or
blurry, for example) someone might have left the camera in MANUAL mode.
Just push the SET button (in the lower left, below the viewfinder screen)
and navigate to Auto mode by clicking on the button to the left button
of the 4 around the green light. |
HOW DO I FRAME MY SHOT?
Its really as simple as
pointing and shooting whatever looks good in the viewfinder screen, but you
can also zoom, take close-ups, and change the flash mode.
 1.
ZOOM: The shutter release is the big button on top, to the right
of the on/off switch (as on most cameras), and the zoom is the ring
around this button, which can be manipulated by pulling or pushing lightly
on the raised part at the front of the ring. If you examine the icons
to the right of the rig\ng, while you are manipulating the zoom, it
should be clear that "wide" is shooting 3 trees, and "zoomed"
is shooting 1 tree. The ELPH can only zoom from 1-2X optically, and
because the zoom to 5X is a digital enhancement (that looks bad), the
camera will stop zooming at 2X, unless you insist and try to zoom some
more ( a good design feature). Just move closer to your subject if 2X
is not enough. Its not pn a tripod and moving around easily is the whole
point of using such an incredibly tiny camera. 1.
ZOOM: The shutter release is the big button on top, to the right
of the on/off switch (as on most cameras), and the zoom is the ring
around this button, which can be manipulated by pulling or pushing lightly
on the raised part at the front of the ring. If you examine the icons
to the right of the rig\ng, while you are manipulating the zoom, it
should be clear that "wide" is shooting 3 trees, and "zoomed"
is shooting 1 tree. The ELPH can only zoom from 1-2X optically, and
because the zoom to 5X is a digital enhancement (that looks bad), the
camera will stop zooming at 2X, unless you insist and try to zoom some
more ( a good design feature). Just move closer to your subject if 2X
is not enough. Its not pn a tripod and moving around easily is the whole
point of using such an incredibly tiny camera. |
 2.
CLOSE-UPS: Although the ELPH automatically focuses, if you want
to get very close to your subject you should click on the flower symbol
(the left button of the 4 in a circle around the green light). This
will allow you to get withing about 6" in wide angle mode and 10"
zoomed, with the net result about the same: an image of an object just
a bit bigger than the ELPH itself. If you are a navel gazer, you can
take a picture of it and gaze at it even when you are far from your
navel. 2.
CLOSE-UPS: Although the ELPH automatically focuses, if you want
to get very close to your subject you should click on the flower symbol
(the left button of the 4 in a circle around the green light). This
will allow you to get withing about 6" in wide angle mode and 10"
zoomed, with the net result about the same: an image of an object just
a bit bigger than the ELPH itself. If you are a navel gazer, you can
take a picture of it and gaze at it even when you are far from your
navel. |
 3.
FLASH MODE: Auto-flash will tend to fire whenever the light is low,
because the image is likely to be blurred by your shaking hand during
a slow exposure. BUT you might have steady hands, or have found a ledge
to rest the camera upon while you shoot your picture, or you might simply
HATE the way all flash photos look like you've caught your subject in
the headlights of your car, and WANT TO TURN THE AUTOFLASH OFF. This
is done by pushing the button to the right of the green light (the opposite
side of the close-up flower icon is the flash bolt of lightning--both
nearly universal icons for these camera functions). On the viewfinder
screen you will see this bolt with a line through it when AUTOFLASH
is turned off. Note: The other symbol is supposed to be an eye, and
it means no-redeye--a function that is supposed to prevent the inadvertantly
demonic glint you've probably seen before. Unfortunately, no-redeye
works by sending a quick flash, before the picture is taken (dilating
your pupils), and this means that the time between the moment you depress
the shutter release and when the ELPH finally makes up its mind to take
the pictures is even more delayed than usual. As it is, if you are trying
to shoot in bad light, the camera already has to send out a beam to
calculate focus and lighting, before it shoots, and the delay can be
a couple seconds under the worst conditions. Try shooting someone dancing,
and you will have to just wait until the camera takes the picture and
pray that it looks good. 3.
FLASH MODE: Auto-flash will tend to fire whenever the light is low,
because the image is likely to be blurred by your shaking hand during
a slow exposure. BUT you might have steady hands, or have found a ledge
to rest the camera upon while you shoot your picture, or you might simply
HATE the way all flash photos look like you've caught your subject in
the headlights of your car, and WANT TO TURN THE AUTOFLASH OFF. This
is done by pushing the button to the right of the green light (the opposite
side of the close-up flower icon is the flash bolt of lightning--both
nearly universal icons for these camera functions). On the viewfinder
screen you will see this bolt with a line through it when AUTOFLASH
is turned off. Note: The other symbol is supposed to be an eye, and
it means no-redeye--a function that is supposed to prevent the inadvertantly
demonic glint you've probably seen before. Unfortunately, no-redeye
works by sending a quick flash, before the picture is taken (dilating
your pupils), and this means that the time between the moment you depress
the shutter release and when the ELPH finally makes up its mind to take
the pictures is even more delayed than usual. As it is, if you are trying
to shoot in bad light, the camera already has to send out a beam to
calculate focus and lighting, before it shoots, and the delay can be
a couple seconds under the worst conditions. Try shooting someone dancing,
and you will have to just wait until the camera takes the picture and
pray that it looks good. |
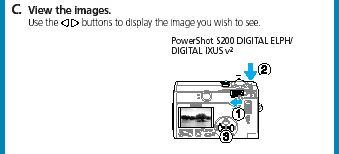
HOW DO I VIEW THE PHOTOS
I'VE TAKEN?
For about two seconds after
you take a photo it will appear on the viewfinder screen, but if you want to
peruse it at your leisure, you will have to switch the ELPH to Play mode. In
Play Mode you can zoom in on your images, to check whether or not they are blurry,
and you can also Erase individual images, to make room for more on the Compact
Flash Card.
| 1.
SWITCH IT TO PLAY MODE: On the back of the camera (top right) is
the switch for Camera Mode(to the right) AND Play Mode (left). It should
be clear which is which from the icons, and please don't use the middle
mode (Video Mode) because it only lasts for about 3 seconds, uses up
a lot of the Compact Flash Card's memory and looks and sounds terrible.
You will see the last image you shot, but by clicking on the buttons
to the left and right of the green light, you can scroll through all
of them. |
 2.
ZOOMING IN AND VIEWING THUMBNAILS: If you look at the icons to the
right of the shutter release, you'll see that beside the black icons
for zooming in Camera mode, there are blue icons (a checker pattern
and a magnifying glass). This should tell you that in Play mode, you
can view 9 thumbnails at a time or zoom into a single image. The thumbnails
speed up the review process, when there are many images, and the zoom
allows you to check whether an image you took was blurry--something
which is very hard to check on such a small display screen.Every great
photographer becomes great by throwing away their bad photos, so feel
free to erase the ones that didn't work out. 2.
ZOOMING IN AND VIEWING THUMBNAILS: If you look at the icons to the
right of the shutter release, you'll see that beside the black icons
for zooming in Camera mode, there are blue icons (a checker pattern
and a magnifying glass). This should tell you that in Play mode, you
can view 9 thumbnails at a time or zoom into a single image. The thumbnails
speed up the review process, when there are many images, and the zoom
allows you to check whether an image you took was blurry--something
which is very hard to check on such a small display screen.Every great
photographer becomes great by throwing away their bad photos, so feel
free to erase the ones that didn't work out. |
 3.
ERASE SINGLE IMAGE:
Any image that you are viewing in Play Mode can be erased by clicking
on the fourth furthest to the right button below the viewfinder screen,
with a blue icon of a trashcan beside it. Just click on this button
and then click on the set button (furthest to the left) when asked whether
you really want to erase it. With two thumbs you can swiftly scroll
through your photos and erase those you don't want to keep on the Compact
Flash Card. You can't UNERASE so check to make sure that you really
want to erase it before you do. 3.
ERASE SINGLE IMAGE:
Any image that you are viewing in Play Mode can be erased by clicking
on the fourth furthest to the right button below the viewfinder screen,
with a blue icon of a trashcan beside it. Just click on this button
and then click on the set button (furthest to the left) when asked whether
you really want to erase it. With two thumbs you can swiftly scroll
through your photos and erase those you don't want to keep on the Compact
Flash Card. You can't UNERASE so check to make sure that you really
want to erase it before you do. |
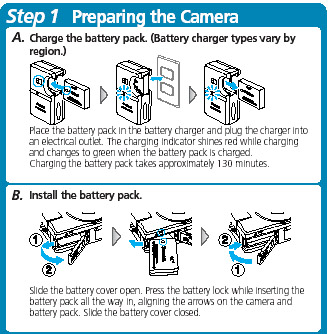
HOW
DO I RECHARGE THE BATTERY?
You remove the battery from
the camera, by sliding the panel on the bottom of the ELPH towards the strap-side,
and then flipping the small brown catch in the same direction. Slidethe battery
into the black and blue plastic recharger, flip the plug prongs out and stick
it in a socket. This Recharger should be impossible to break, but if you force
the digital ELPH's battery into the slot backward, it will go in but it will
only come out with difficulty, so please bring it back to the 4th floor of Sweet
Hall and let Carlos remove it if it gets stuck.